
Hello ya’ll!
I am so excited to share with you how we built our very own farmhouse fireplace in our upstairs living room! You might want to get comfy for this one, it’s a bit long 🙂
First I should give you a little back story that brought this project to the top of my to-do list. My mom lives in a much warmer region of the country and was planning to come and stay with us over Thanksgiving. Since she had been here the previous May-June for graduations, and literally froze during her stay, I was very concerned about her being too cold while she was here during the actual winter. Sitting in our upstairs living room one night, I had a brilliant idea to add warmth to our upstairs by installing an electric fireplace.
While we watched the evening TV I started doing some research on how much one would cost, how efficient it might be to run, and how to install one safely. Knowing that I didn’t want to cut into our existing walls, I started diving into building our own faux fireplace. Next, I pulled out my sketchbook and started drawing out the plan for the size and visual aspects of the design.
As most of my ideas go, it started out fairly simple and became more complex as I dug in. The first step once I had the rough concept was to order the fireplace. I ordered it from Amazon (of course) and it was going to be here in about a week. That was enough time to purchase supplies and begin the build.
During the course of building the fireplace and planning for my mother’s arrival, my husband had surgery for carpal tunnel on his right hand. This meant that the build was all on me with some instruction from darling Handy Hubs (Adam) . I was ready! #womanbuilder
I wish I could find the information on the electronic fireplace we purchased. All I can tell you is that I am an avid review reader before I click BUY for anything that is electronic or digital for our family. I absolutely despise having to return stuff. We selected one that was a decent size, had the ability to blow heat out, and was pretty – all black with multiple fun color-changing options. It was easy to put together and very quick to install.
Building Supplies
8 – 8ft 2x4s
1″ wood screws
2 sheets 1/2″ plywood
2 sheets 1/4″ smooth plywood
6 – 1x2x8 for trim
Level
Square
Tape Measure
Air Nails and Nail gun
Paint
Mortar
Tile
Grout
Miter Saw
Day #1
16.5 x 30.5 For the build, we measured and cut the 2x4s to create two side support pieces that would go from floor to ceiling with two supports in between the length. We wanted good ventilation around the fireplace, so we opted to have the overall depth of the faux chimney be 14″ with the framing measuring 12.5″ from outside 2×4 to outside 2×4. Once the plywood, wood and trim are added the overall depth will be about 14″.
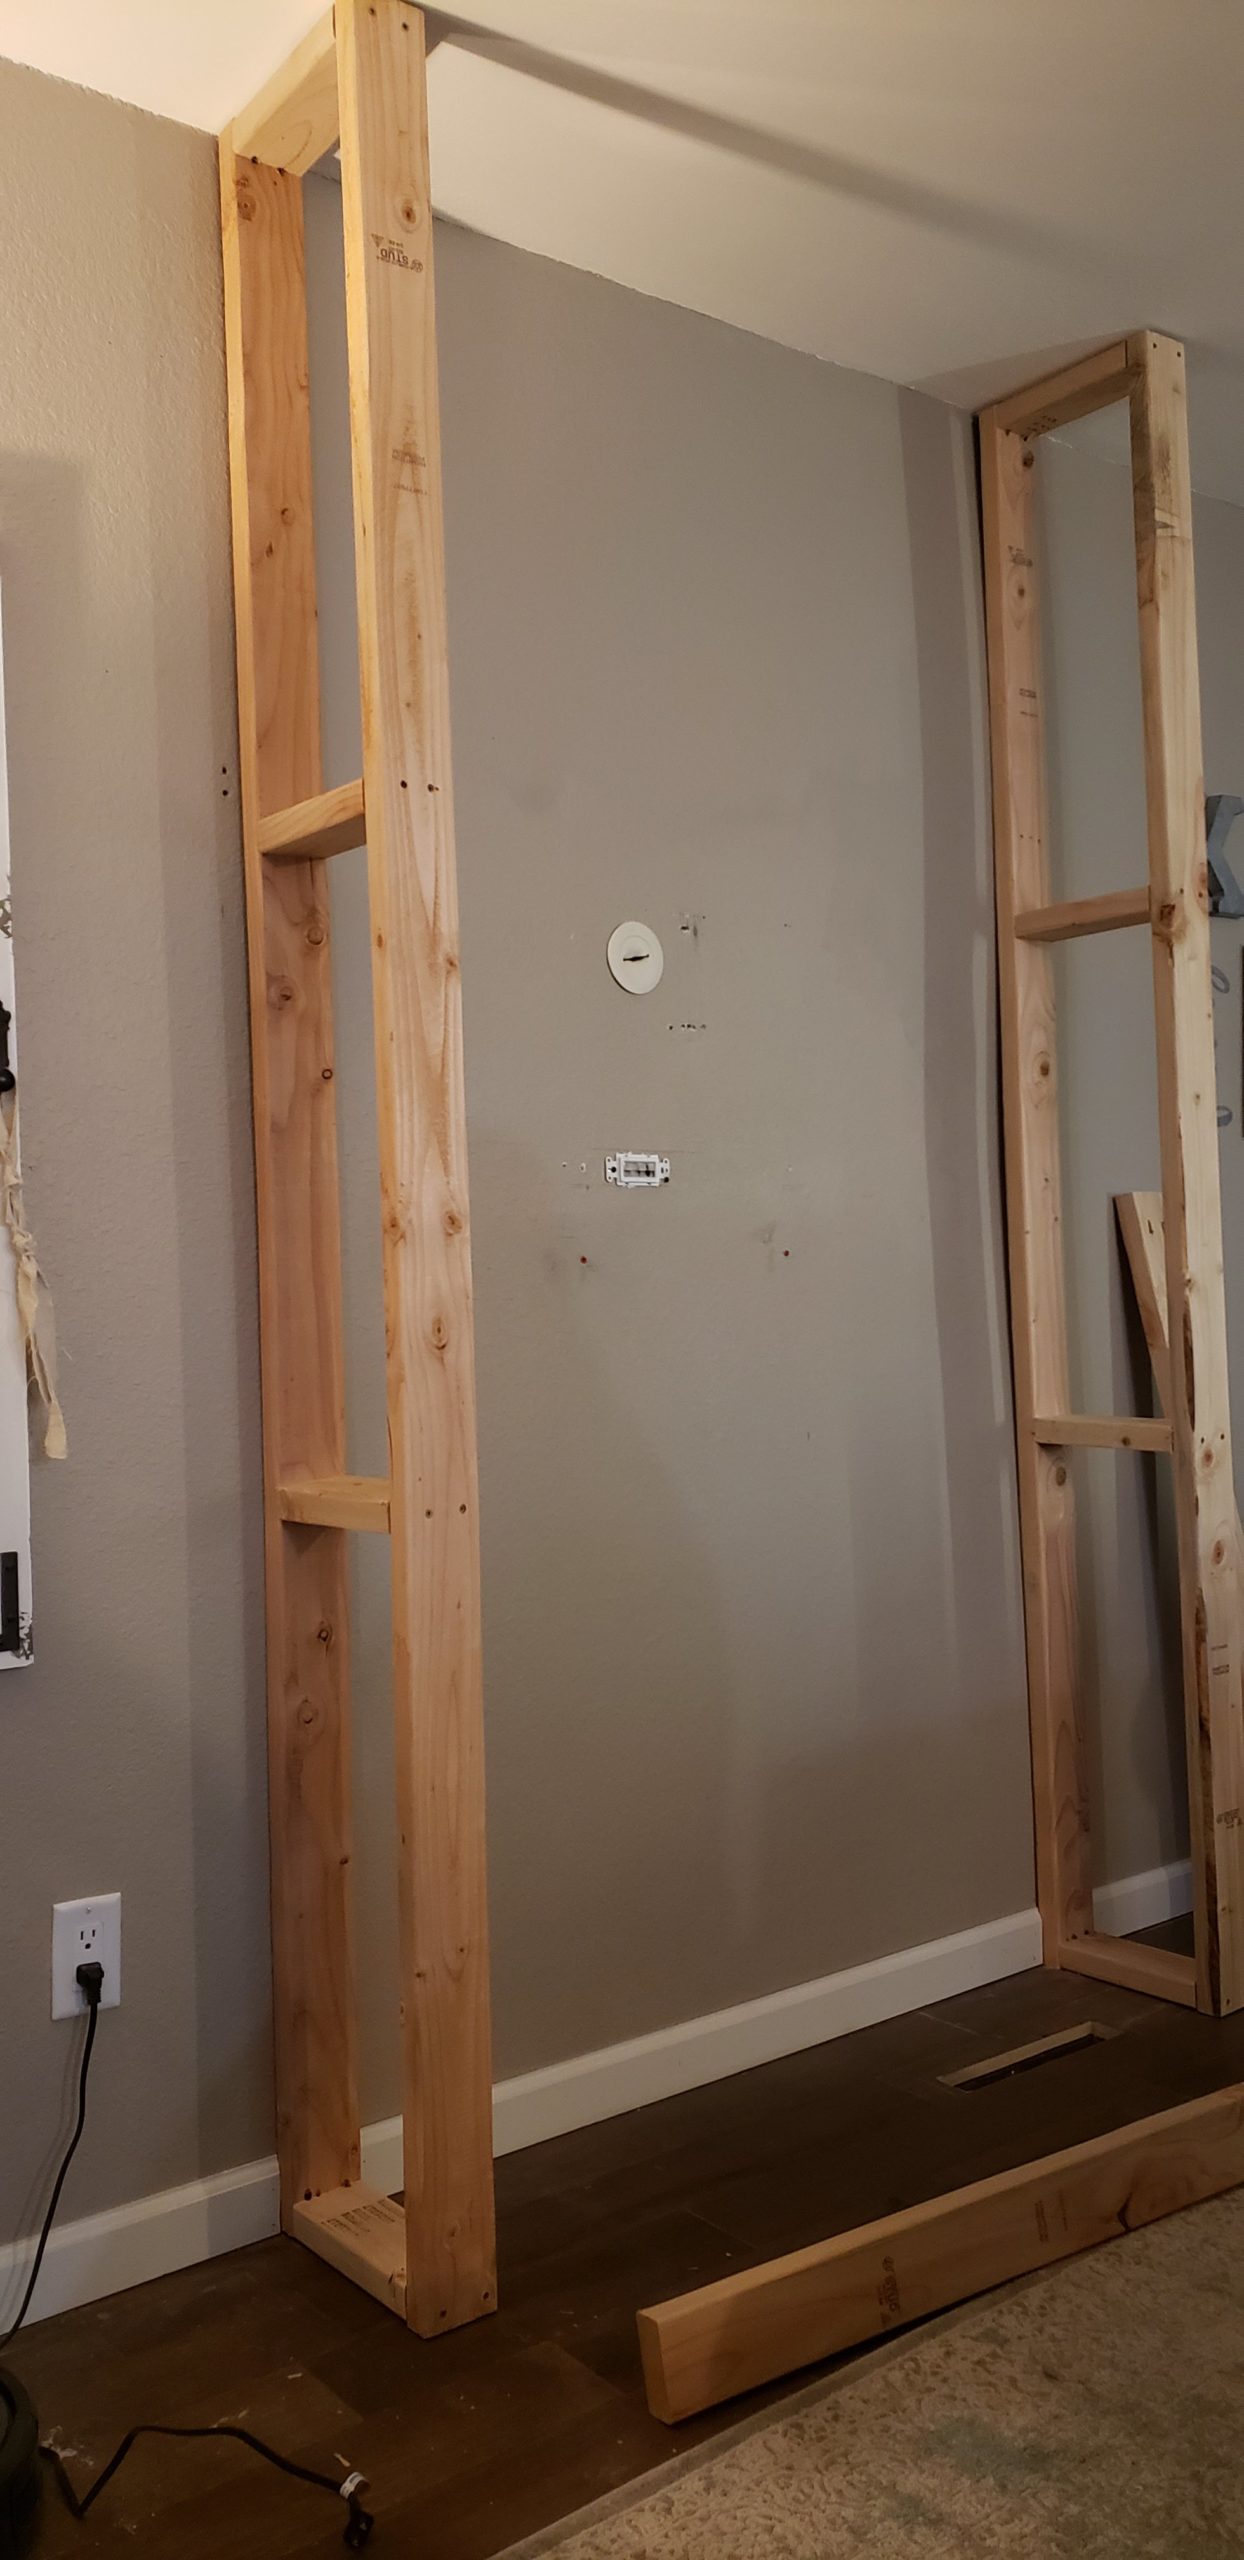
With the side supports built, we carried them into the house to attach to the wall. We decided that we didn’t want the framing attached to our beautiful hardwood floor or to the ceiling, in case someone wanted to remove it in the future, so directly to the wall itself was the way to go. We marked the wall and spaced the supports out from inside edge to inside edge at 54″ and screwed into the wall studs.
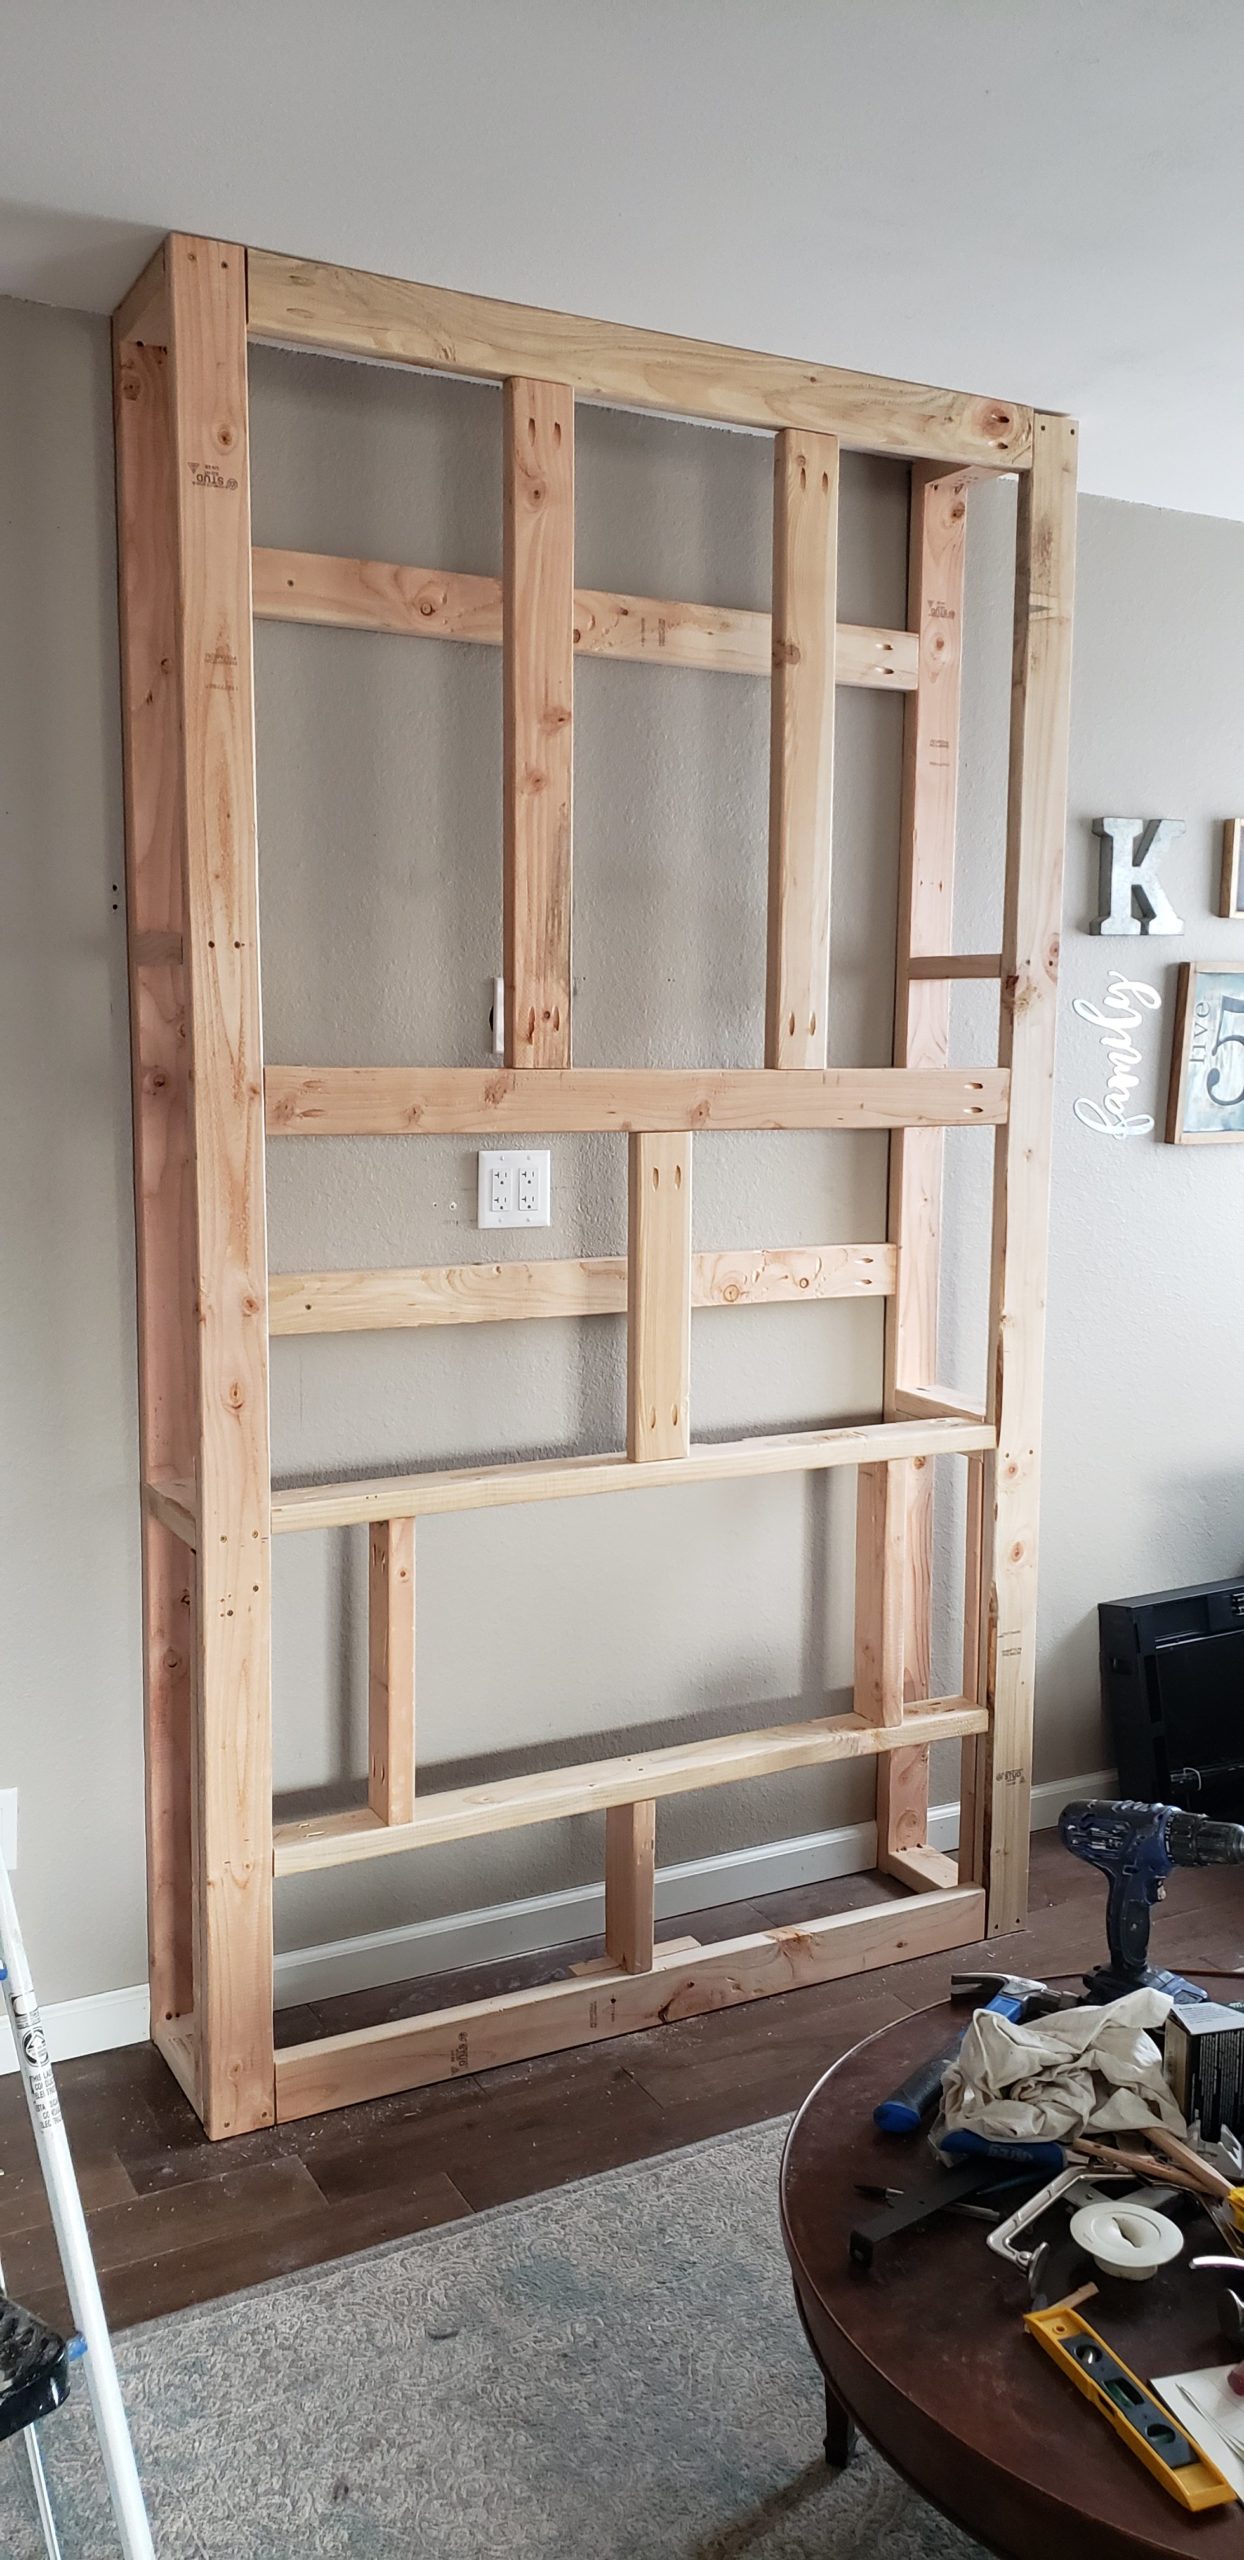
The fireplace arrived in perfect condition allowing me to measure the insert area and determine where the framing needed to be for it to fit into the build. This part took me a bit of time, because I was struggling with how far up I wanted the fireplace to be from the floor. We had not yet ruled out a hearth as part of the build and I wanted to keep my options open. I settled on the outside edge of the front of the fireplace at 15″ above the floor.
I measured and cut seven boards, that would provide support across the front and the back to connect to the two side supports and create the overall structure. I then, Kreg jigged the end of each board to attach them securely to the framing. The interior of the fireplace sits 54.5″ up from the floor, so I place one of the boards there and one at the top where the top edge could attach. I then realized I needed to add back support to the top 2×4 board that framed the top of the fireplace so that the installation would work. We placed the fireplace in the frame to ensure a snug fit before moving on to the next steps.
You can also see that the back wall has been updated. Handy Hubs (Adam) completed some wiring work to have an outlet that we could easily access for the TV and other items.
There are many ways in which you can frame and finish your faux fireplace. We had determined that the most affordable method for us was going to be a fully ship lapped design. But first, we would install 1/2″ plywood over the framing to support the shiplap. I have seen some installs that use drywall, but for the time and expense, we felt there was no sense for installing drywall when our plan was to cover it all up.
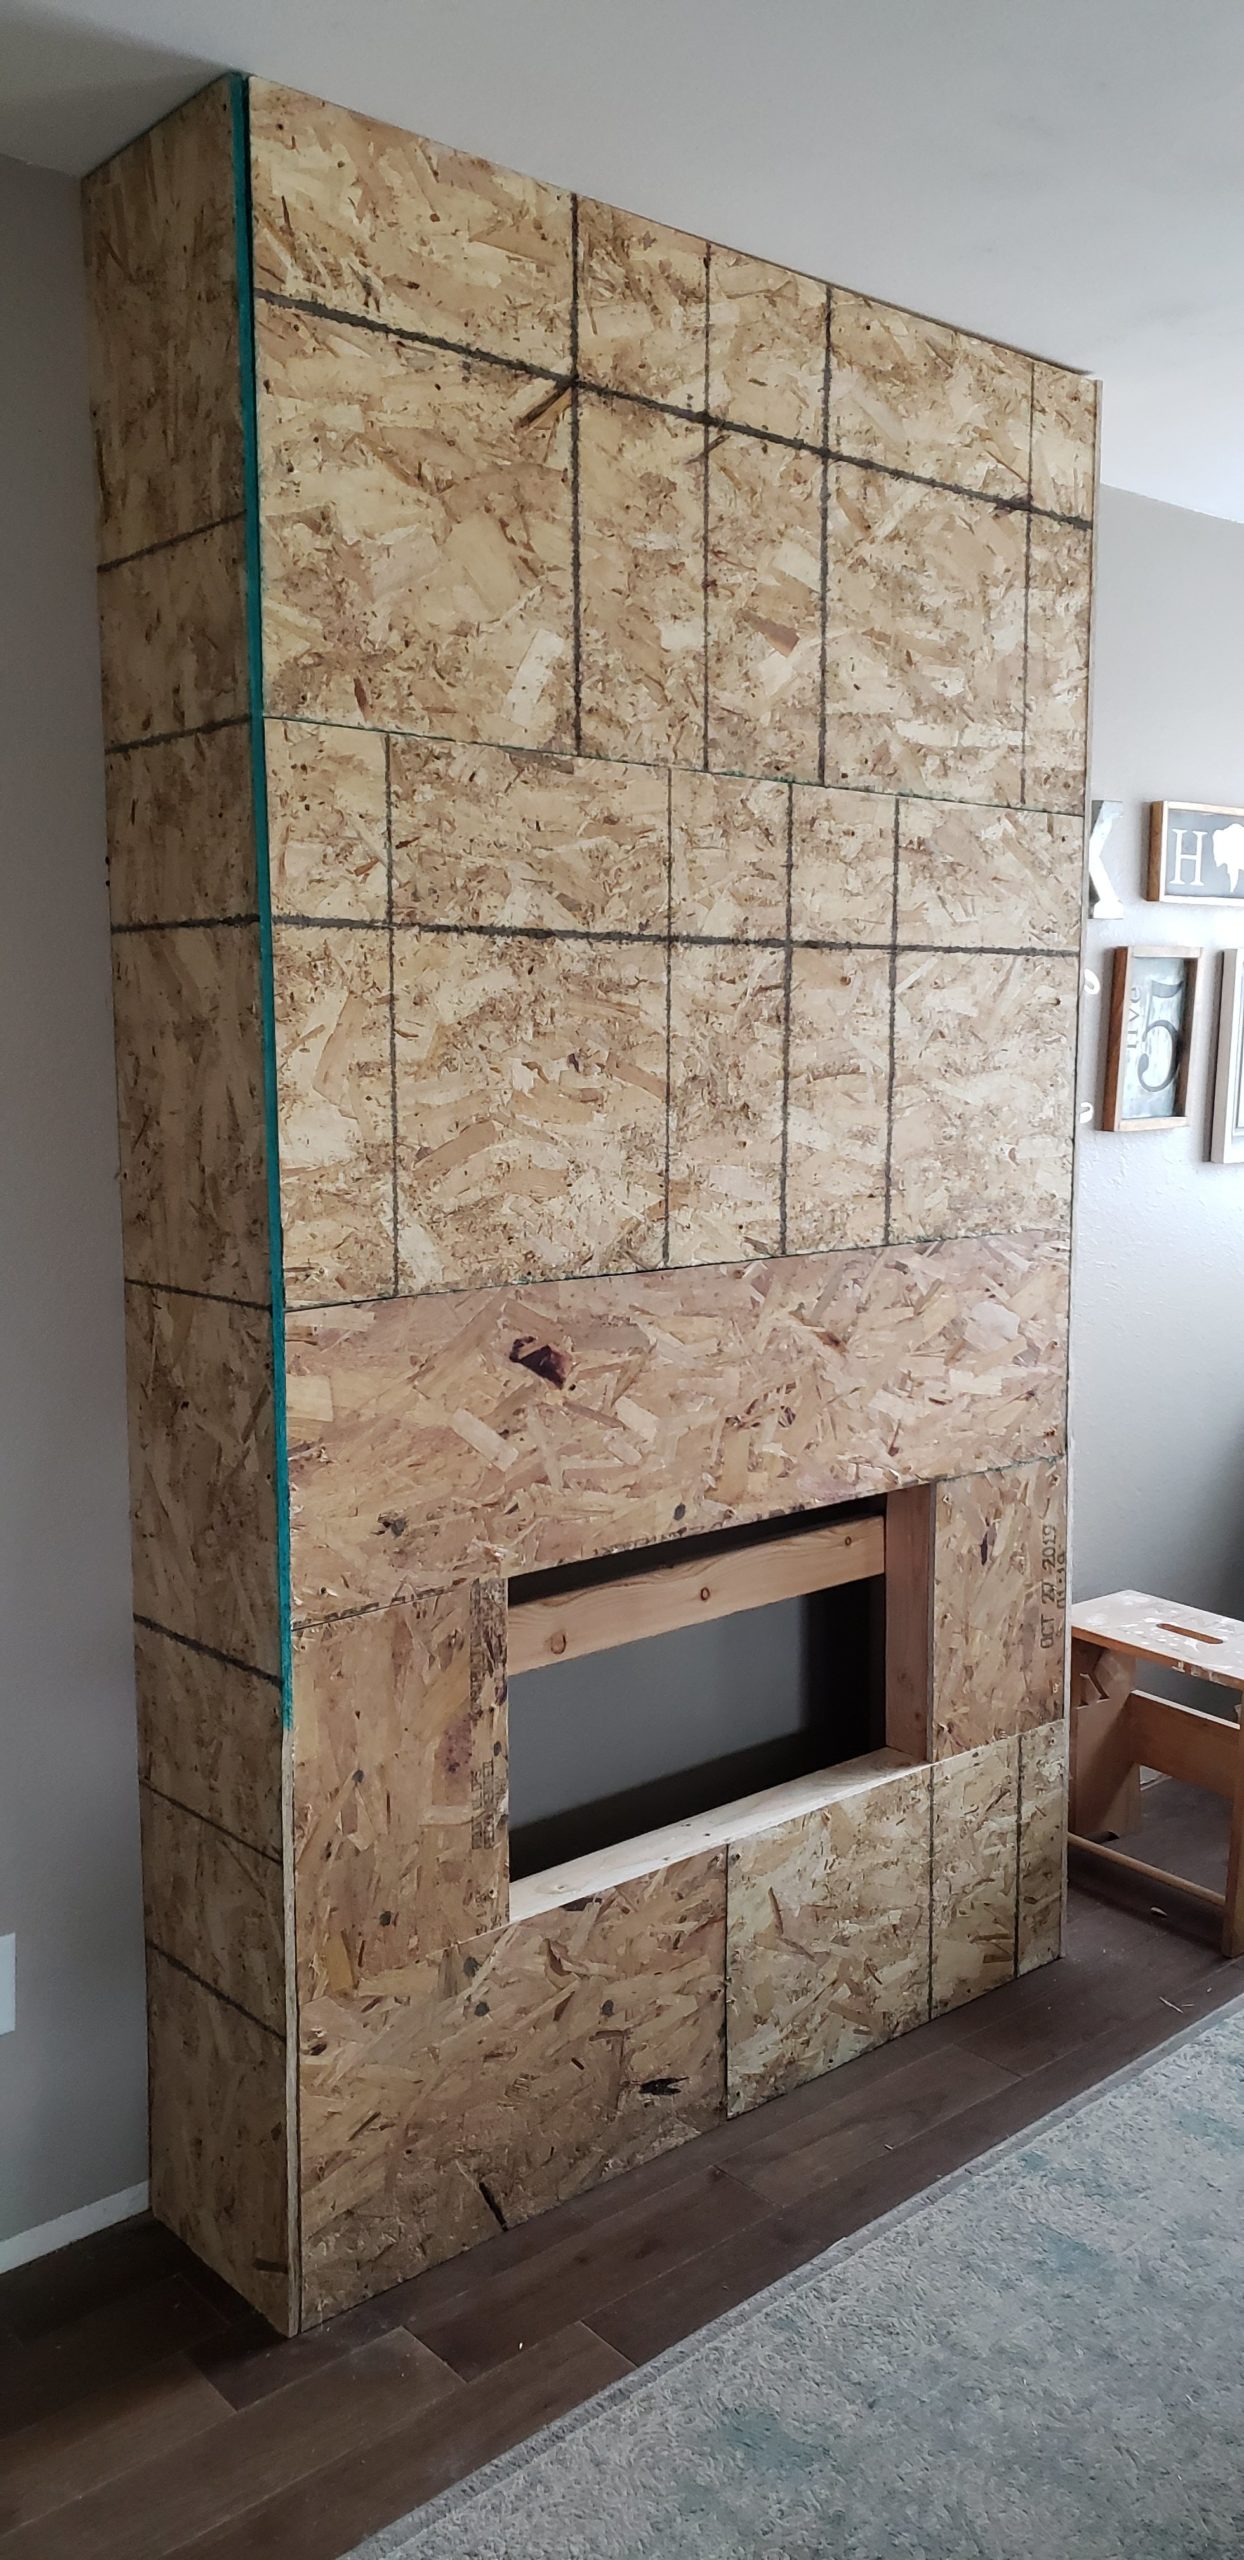
With all the ply woodcut and installed, we sat back to enjoy the rest of the evening and I took a much-needed break. Cutting and installing plywood on my own was a tall order and I was whooped!
Day #2
You might remember earlier in my post I stated that the design idea was to cover the entire build with shiplap to finish it off. Well….. as you might have guessed, I sort of changed my mind the night before we headed to the store (Lowes of Course… Duh) to buy our 1/4″ plywood for the shiplap. I know, I know! Big surprise! But I have to tell you why!
We have a less than glorious real fireplace in the basement. I dream of refinishing quite often, but am having a hard time digging in and getting it done. I’m not sure why – maybe because I don’t care for the structure of it and that shuts off my creativeness. Anyway, with all that dreaming, I figured that if I’m building this one from scratch I should do what I Really Really want….. right? That’s where the tile comes in!
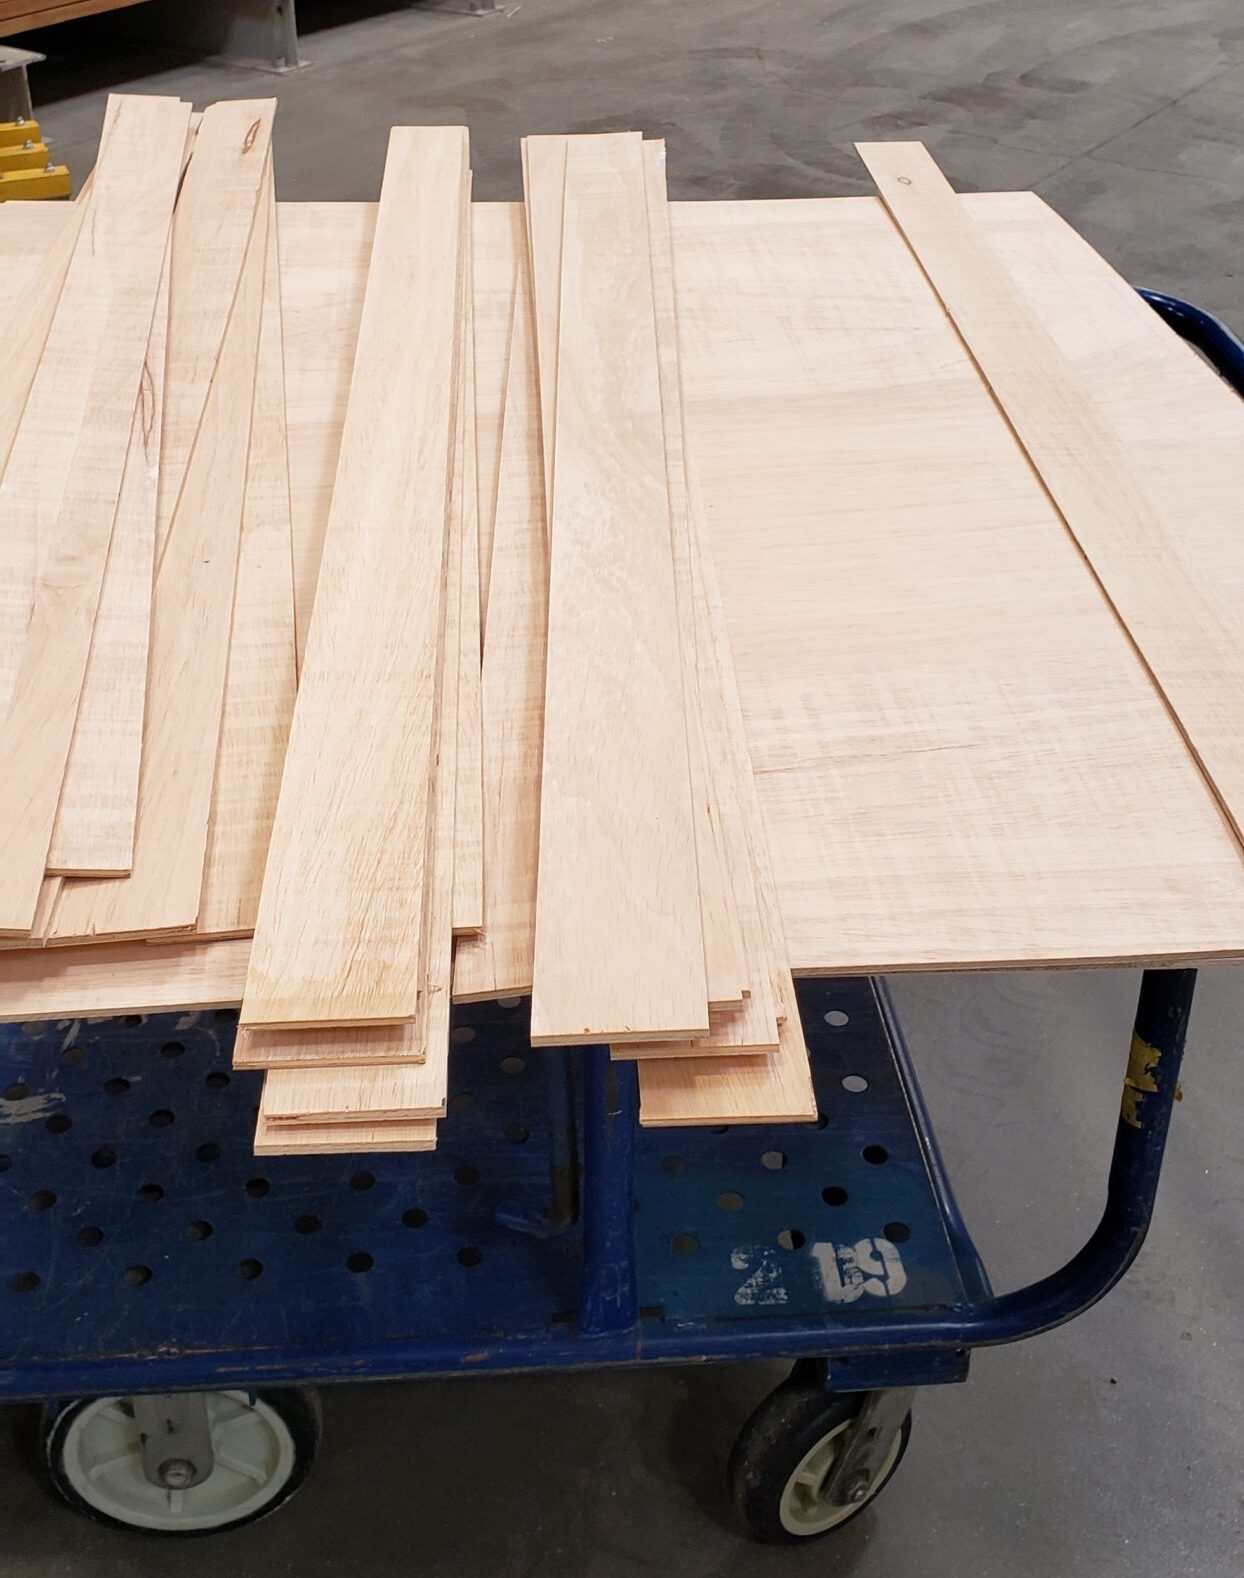
Purchase 1/4″ plywood – Check! Have it ripped down to 3″ strips – Check! Purchase an extra piece for trimming out around the tile – Check! Check!
Now for the tile 🙂 Oh, how I adore herringbone marble tile. It’s so nice. I love the selection at Home Depot for backsplash and we headed there to basically blow our entire project budget. (oooops!) But again, if we are going to do this, let’s do it right the first time.
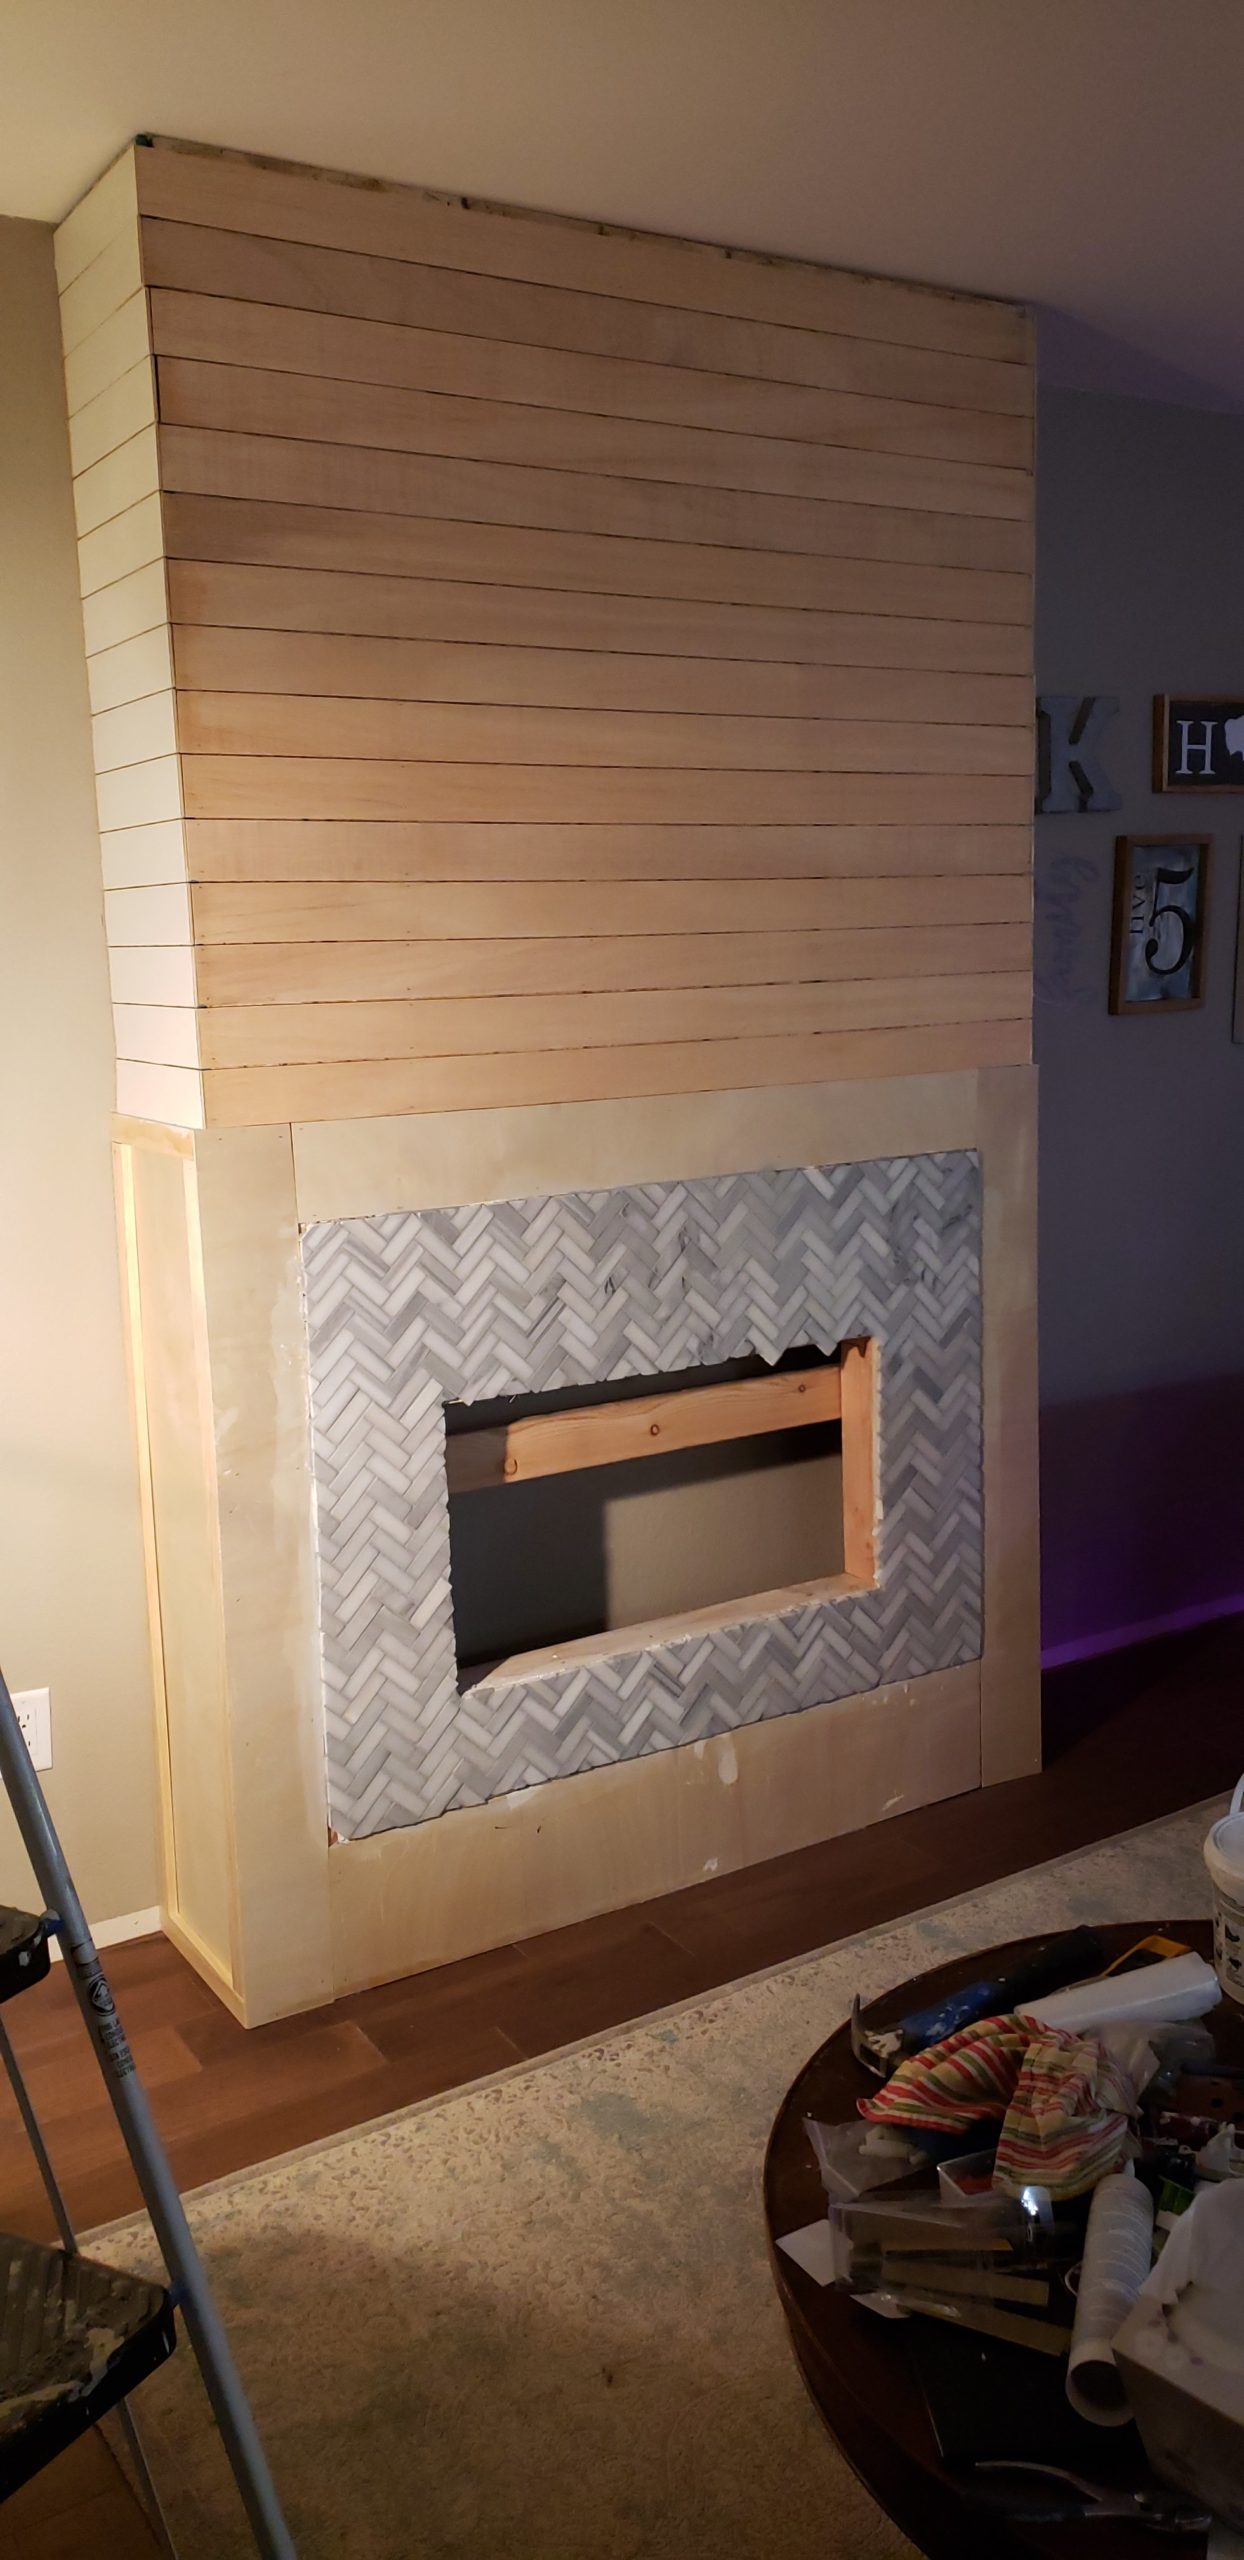
Next we start by installing the shiplap because we know it’s doing to start from the ceiling and head down towards the mantel area. How far up to place the mantel? This one was a struggle for me, as you can really play with this visually and there aren’t really any “rules” to where the mantel should live. I also didn’t find many blog posts where people shared their placement – so I’m going to tell you ours in case it helps you out. Since we had decided to mount the tv over the fireplace, it was our biggest factor in figuring out the mantel. Our TV for this space is a 55″ and we determined that we wouldn’t need a bigger one ever upstairs and that any smaller would leave us sad. The TV needed to have space between it and the ceiling and if we sat at our couch we wanted tv viewing to be comfortable. Eventually, we want to install ceiling speakers, but for now, we also had our soundbar that is attached to the bottom of the tv to consider as well.
Our mantel ended up being 48.5″ from the floor and we settled for a 3.25″ thick cut of rough cedar some friends gifted us. Works perfectly!
Handy Hubs cut an access panel into the shiplap wall to hide all the cords for the TV which is so awesome! He can move the TV and open that to do any cabling work that needs done without cables showing.
Day #3
We trimmed out the bottom area of the fireplace with our 1/4″ plywood and determined the area for the tile. We ended up running back to the store for a few more sheets of tile than we had originally planned for once we completely scrapped the hearth for good. The hearth would have limited walking space in our already somewhat small living space and neither of us could see any value in that. With Handy Hubs still recovering from his wrist surgery from about four days ago, he is doing well and able to assist with cutting tile. The tile was tricky to install but overall, we are very pleased with the outcome.
Day #4
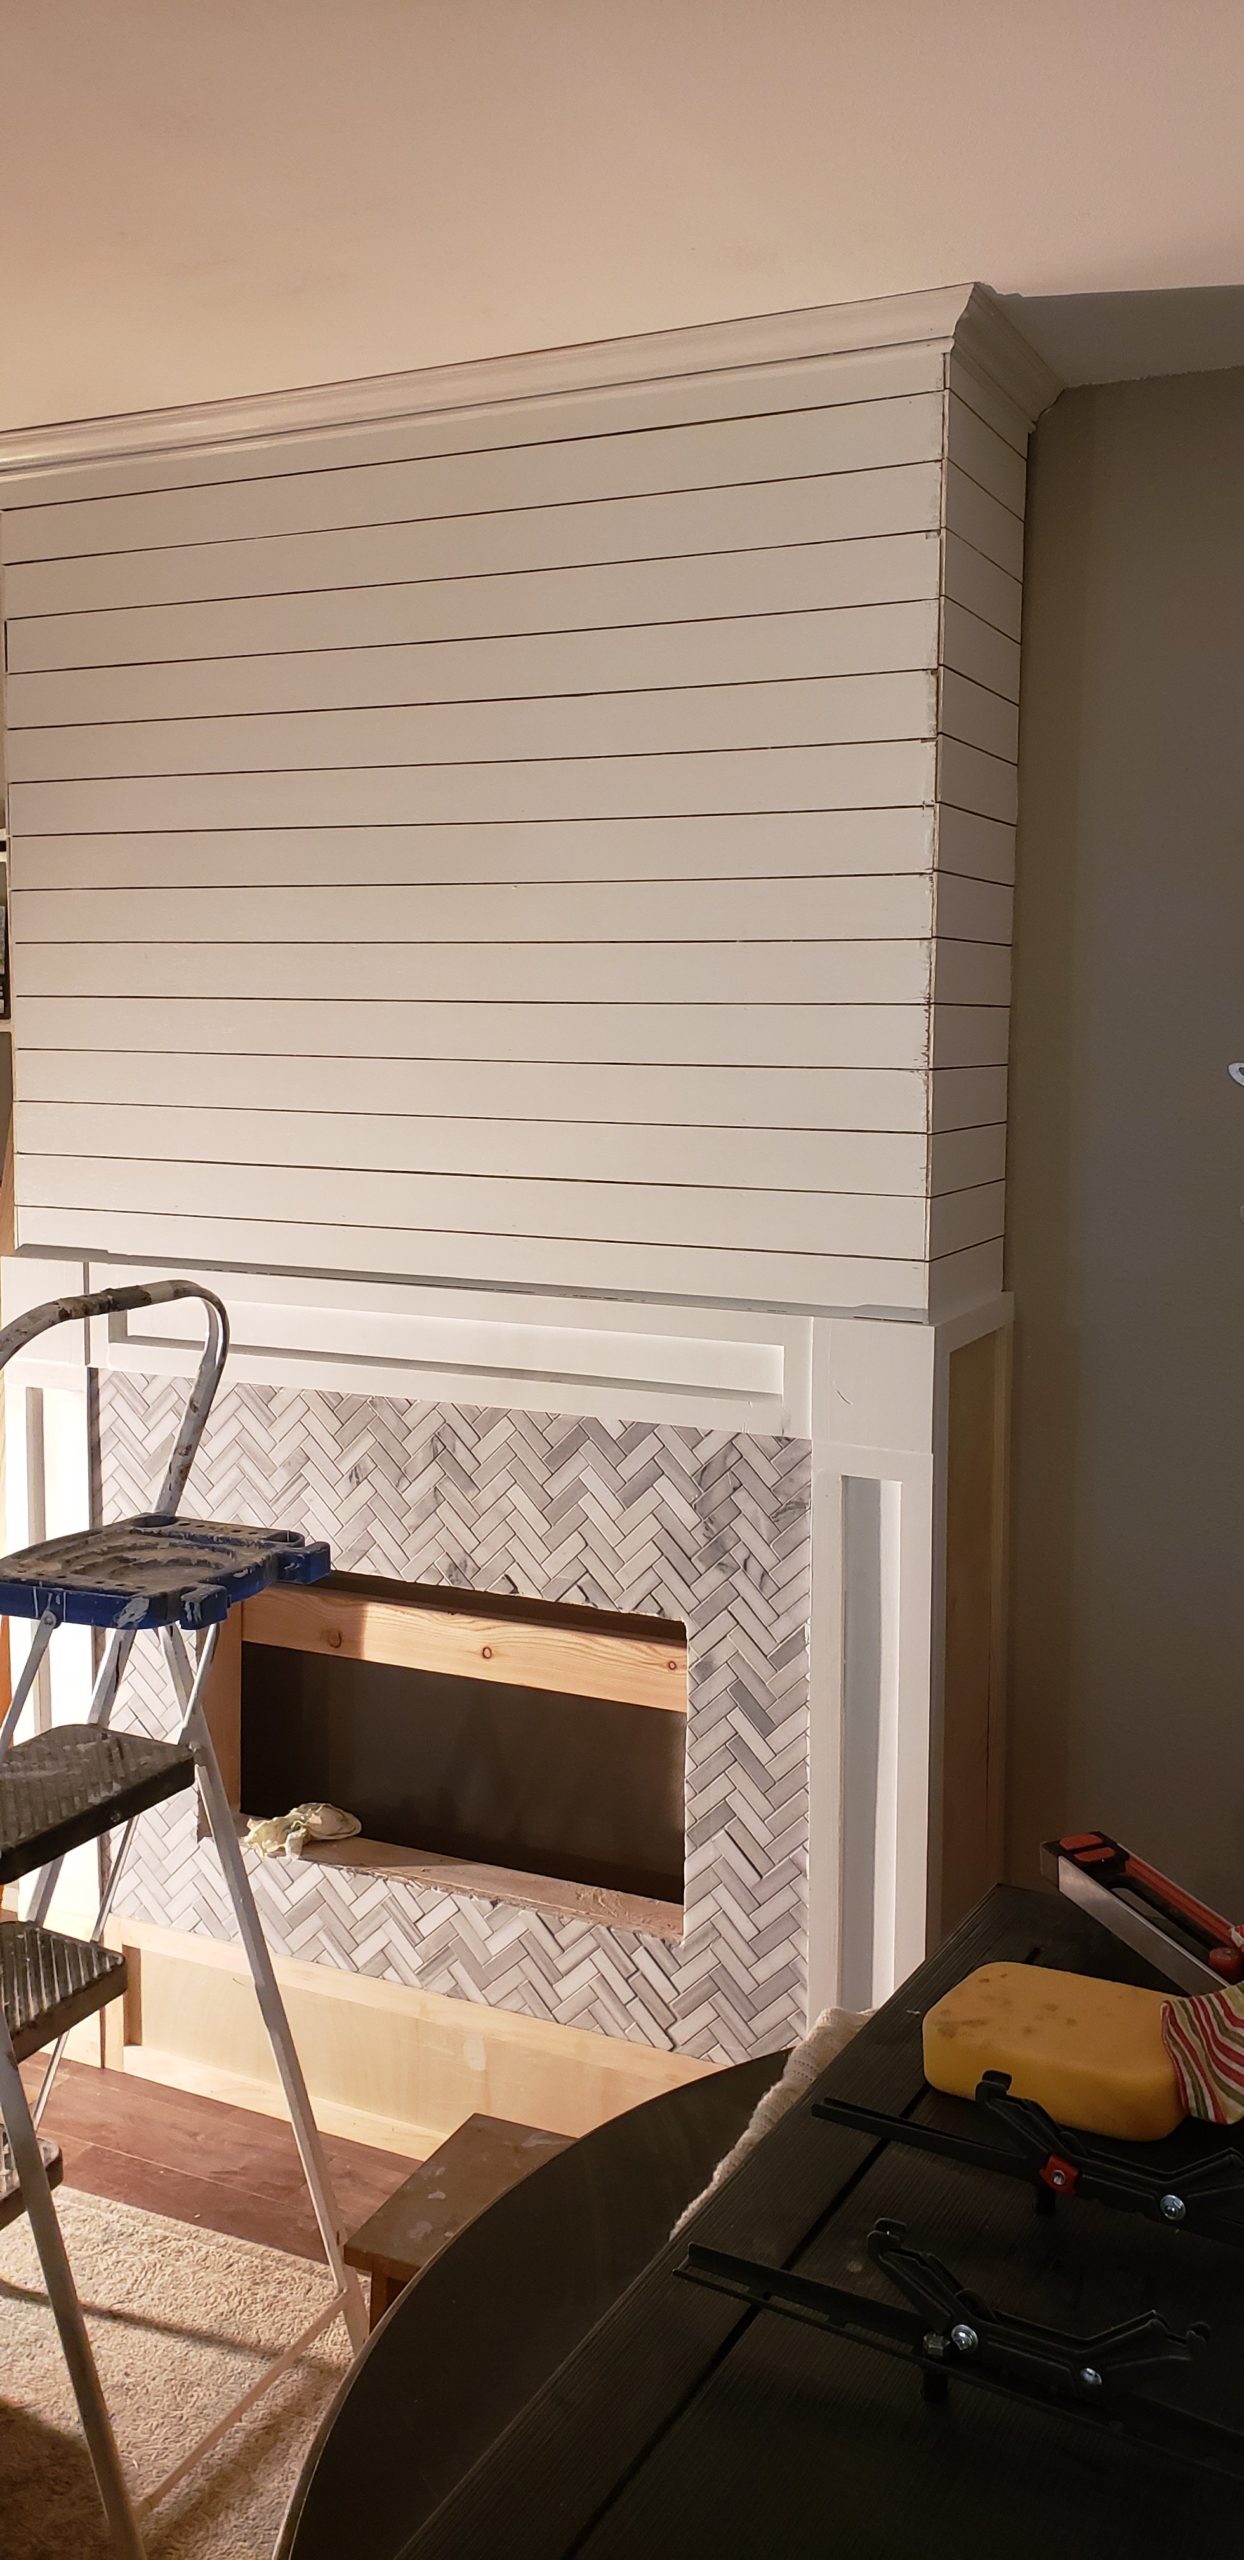
We are almost done!!! Only a few pieces of tile were loose so we added some mud to each and allowed a few hours of dry time while we continued painting another coat on the trim. We cleaned the grout lines and mixed the grout to apply to the tile. I was able to do this part on my own once it was mixed. Have you ever grouted tile before? It’s pretty fun! I enjoyed using the tools and squishing the grout in there then wiping off with a big damp sponge. It’s dirty work and I ended up doing this in a dark room with a hot work light shining on me but overall, I’d do it again in a heartbeat.
Day #5
Today the finished tile and trim look so amazing! We are installing the mantel and adding trim and crown molding to the top of the fireplace and installing the TV. Handy Hubs is going to build me custom corbels for the mantel but I haven’t designed them just yet, so that will be a step down the road.
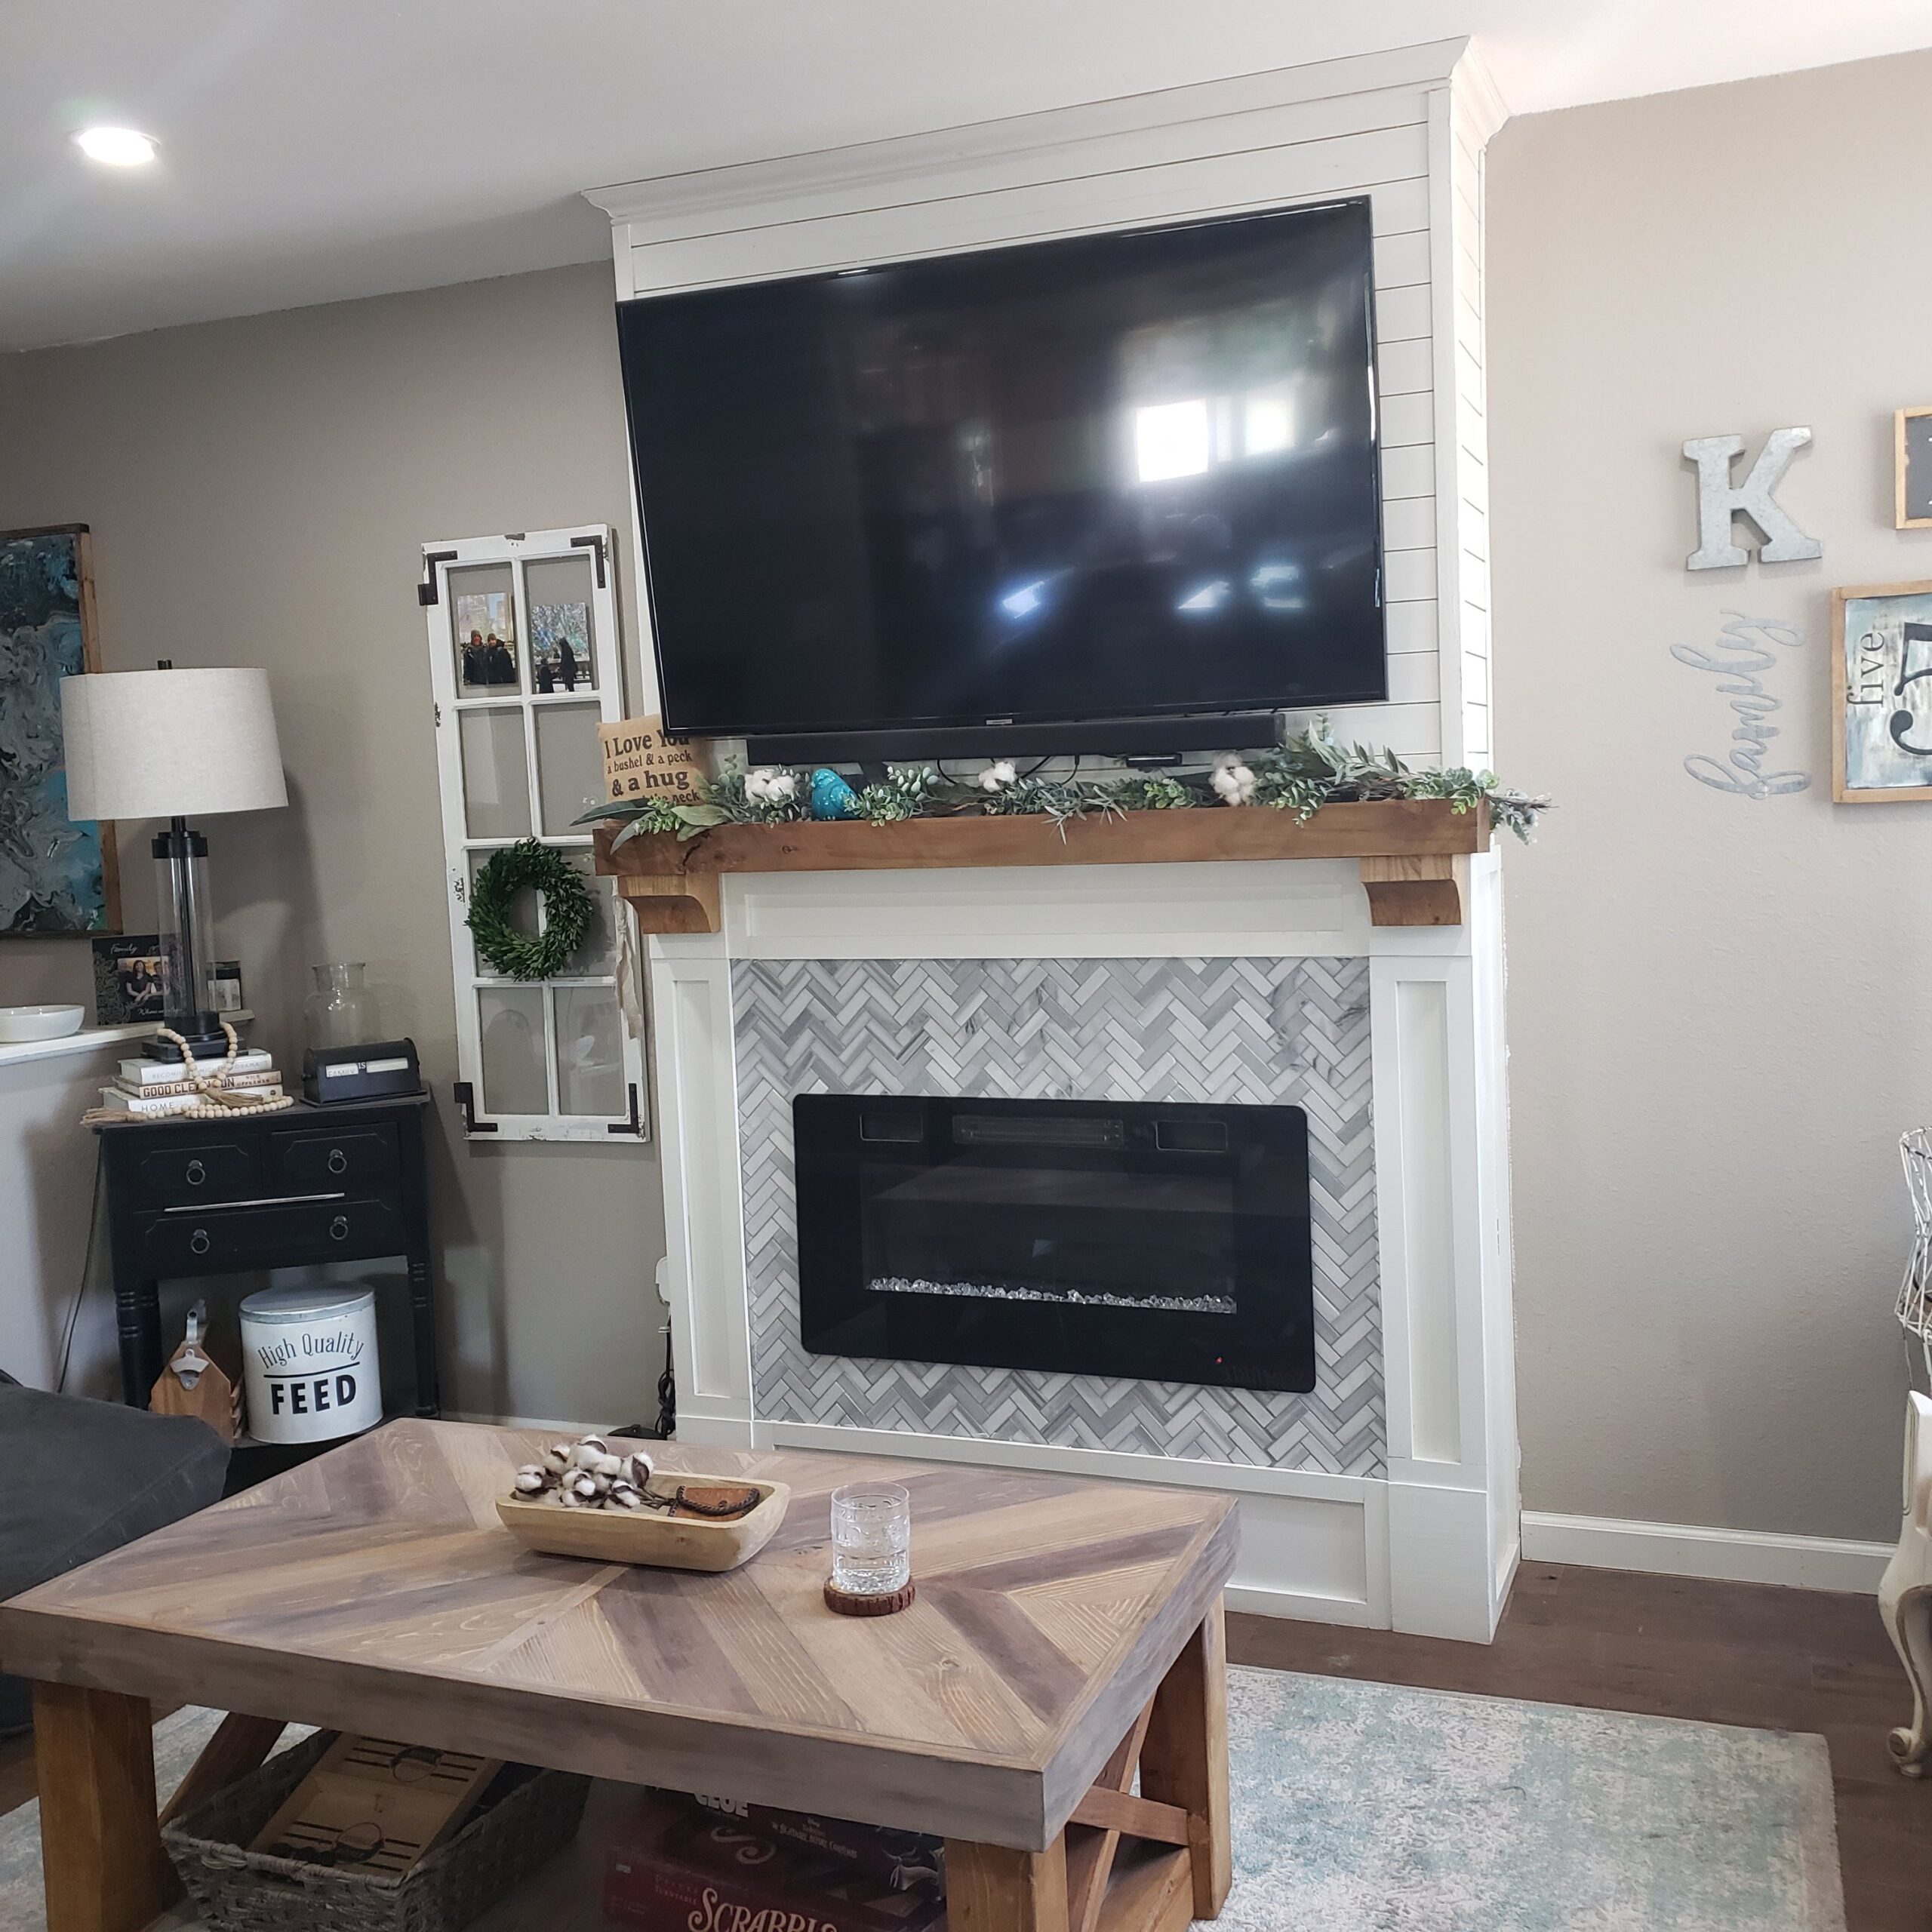
Overall, we love how this project turned out. My mom and the whole family enjoyed the extra comfy heat and how the new fireplace just adds to our space – makes it feel so comfortable and homey.
I hope you enjoyed this post and found that this is a great DIY project you can undertake for your own home to add comfort and value.
See ya next time!
…. Update 3 months later:
Hey all!
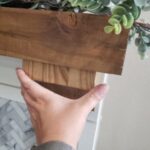
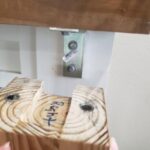
We finally added the corbels. Here are some pics of our crazy corbel customization too. We installed heavy-duty magnet circles to the corbels so they are removable. I didn’t want any holes in them to secure them to the mantel and no holes in the mantel either so this was the way to fix that. Plus, I like that we could design a few other corbels and change them out if we really wanted to… is that unique or what? Ha!


1 thought on “DIY Electric Farmhouse Fireplace Build”