This lovely project started in July 2017 – this is the month we decided to take on not one, but TWO home remodel projects… the laundry room and the pantry.
Let me share how this “crazy” situation came to be…
Summer 2017: Our washing machine decided to stop working which, conveniently, leads us to finally purchase the Samsung front load washer/dryer combo we had been eyeballing. Of course, me being me (sorry HandyHubs) I cannot simply replace the old with the new – I submit that we should improve the entire laundry closet/area as well. {You can read more about the laundry room makeover soon.}
In the meantime, that same day…. HandyHubs and I are doing some house cleaning. He decides to tackle the fridge/freezer, so I reluctantly opt to clean and organize the “pantry”.
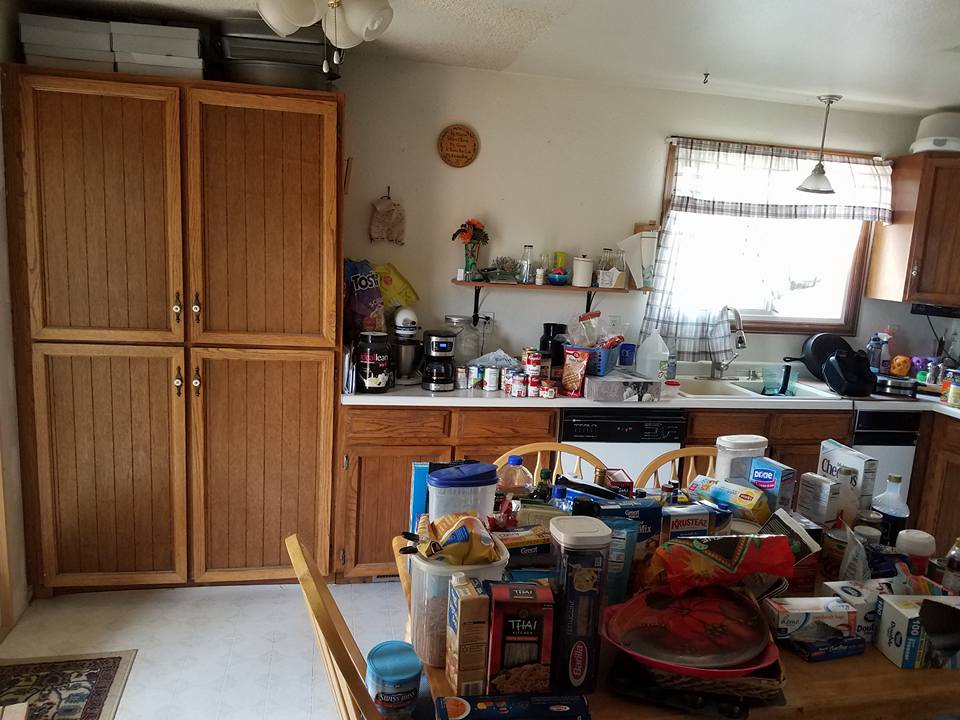
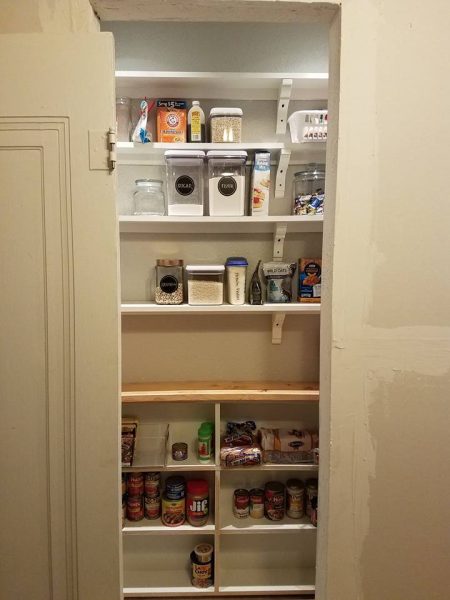
This is our pantry. You may have one similar and I dare say, you may loathe yours as much as I do mine. Our gigantic cabinet pantry is nearly 3 ft deep and impossible to keep organized. I dove into the project – everything came out….the top is three shelves filled with food items – canned, boxed, bagged, bottled. Completely disorganized no matter how hard I try. Each month I find I have re-purchased food items I already had but couldn’t find. As I am up on my step stool, dragging item after item out – I decide that I’m just done with the entire thing. I simply would not put any of it back in that old, outdated,
hard to organize space.
Hubs, I want to build a real pantry.
By the time I came to this decision, HandyHubs was done with the fridge/freezer. He had moved on to the basement laundry area, prepping to lay wood-look tile in the laundry room. I very sweetly said , “Hubs, I want to build a real pantry.” He assumed I meant in the future. I didn’t. He wasn’t very pleased with me. That day we drew our plans, bought supplies and began our 6-month journey to a glorious new pantry.
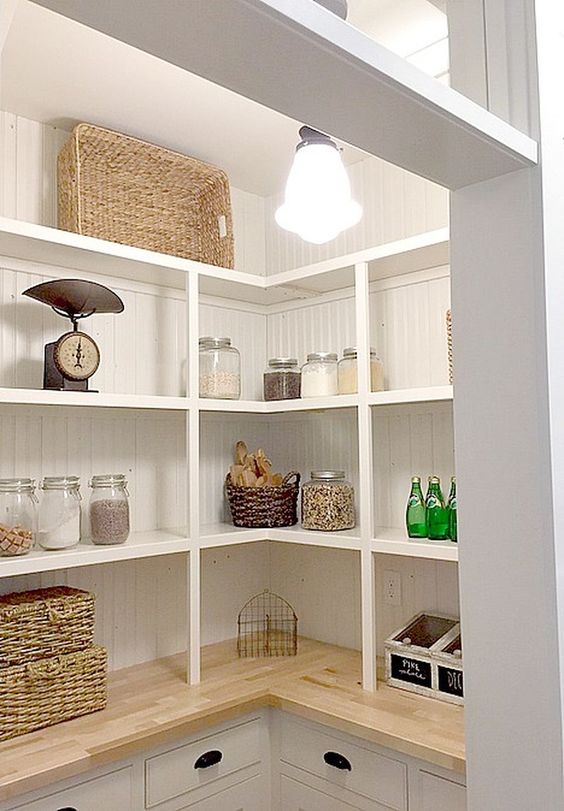
Before we get to the fun part, let me share a little bit about my discovery for planning this pantry. Pinterest, Instagram – hours of researching pantry makeovers, tips, and tricks for organizing your pantry. One such result that inspired me is Lauren Ashworth’s step in pantry, which you can see here. I also drooled over this pantry photo to the left, knowing that I did not have the space to pull it off but loving all the clean bright white in the beautiful design, and the lovely glass above the door that allows for light. I had to really think about what I wanted, the space we had to work with and of course the budget for this little makeover. My wish list came down to:
- white shelves supported by corbels
- a step in pantry
- organized container storage
- a built-in spice cabinet
- countertop space for small appliances
- lighting and outlets
- a sliding pantry door
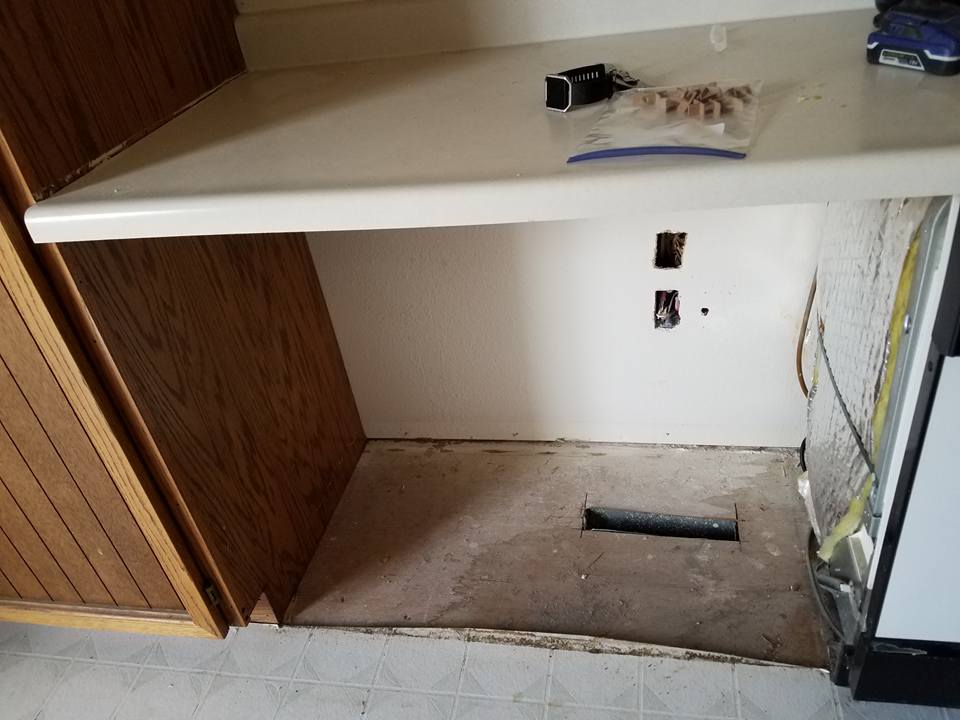
Once we removed the existing pantry (heavy!!), we had to engineer some additional space for my dream pantry. We began the removal of the bottom cabinet to the right of it. This would remove some of our existing countertop space as well, and lower our usable cabinet storage. We were not deterred though, because the future redesign of our kitchen would include kitchen island.
By the end of the day, we have removed the old pantry, the under cabinet, cut the countertop to meet up with the new pantry wall, and created a supply list. The next day we purchased supplies and put up the framing for the pantry walls. Next, we ran wiring and cut holes for the ceiling lights.
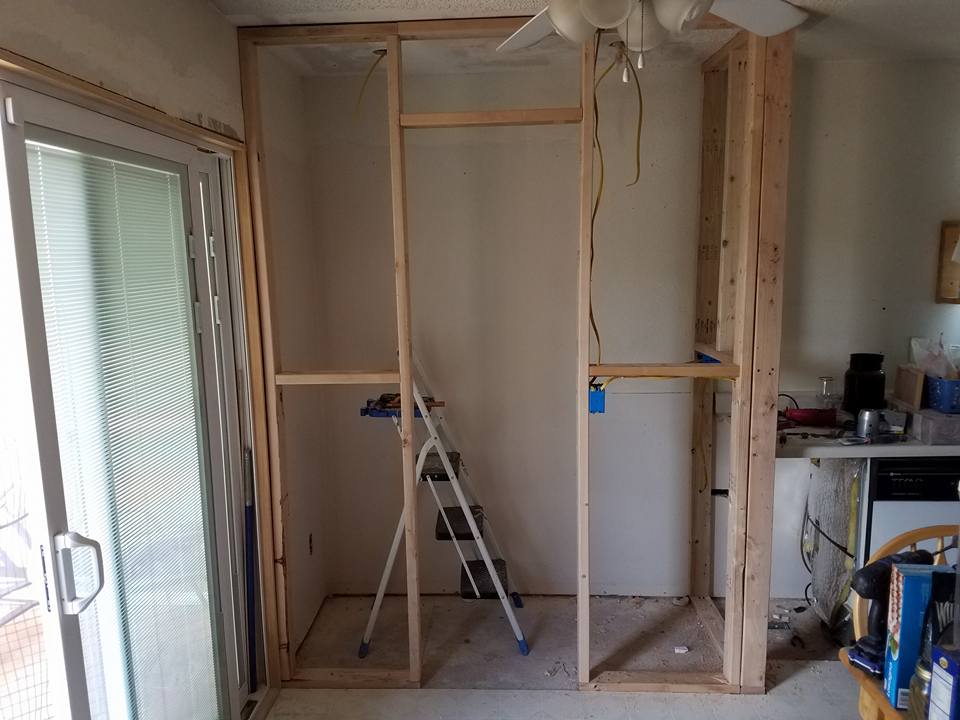
As with any home remodeling project, we did encounter a few obstacles that required some creative solutions. One of them was the ability to fit in a set of drawers between the new pantry wall and the dishwasher. We purchased a pre-fabricated drawer set from Lowe’s and had to shave down the trim on either side of the set to make it fit in the space provided.
The left side wall of the pantry meets with the sliding glass door to the back deck. HandyHubs and I were pleased that when we replaced the sliding glass door a few months prior that we had selected a smaller one and had it framed in on that end. This would give us the additional space we needed to make my step in pantry a reality.
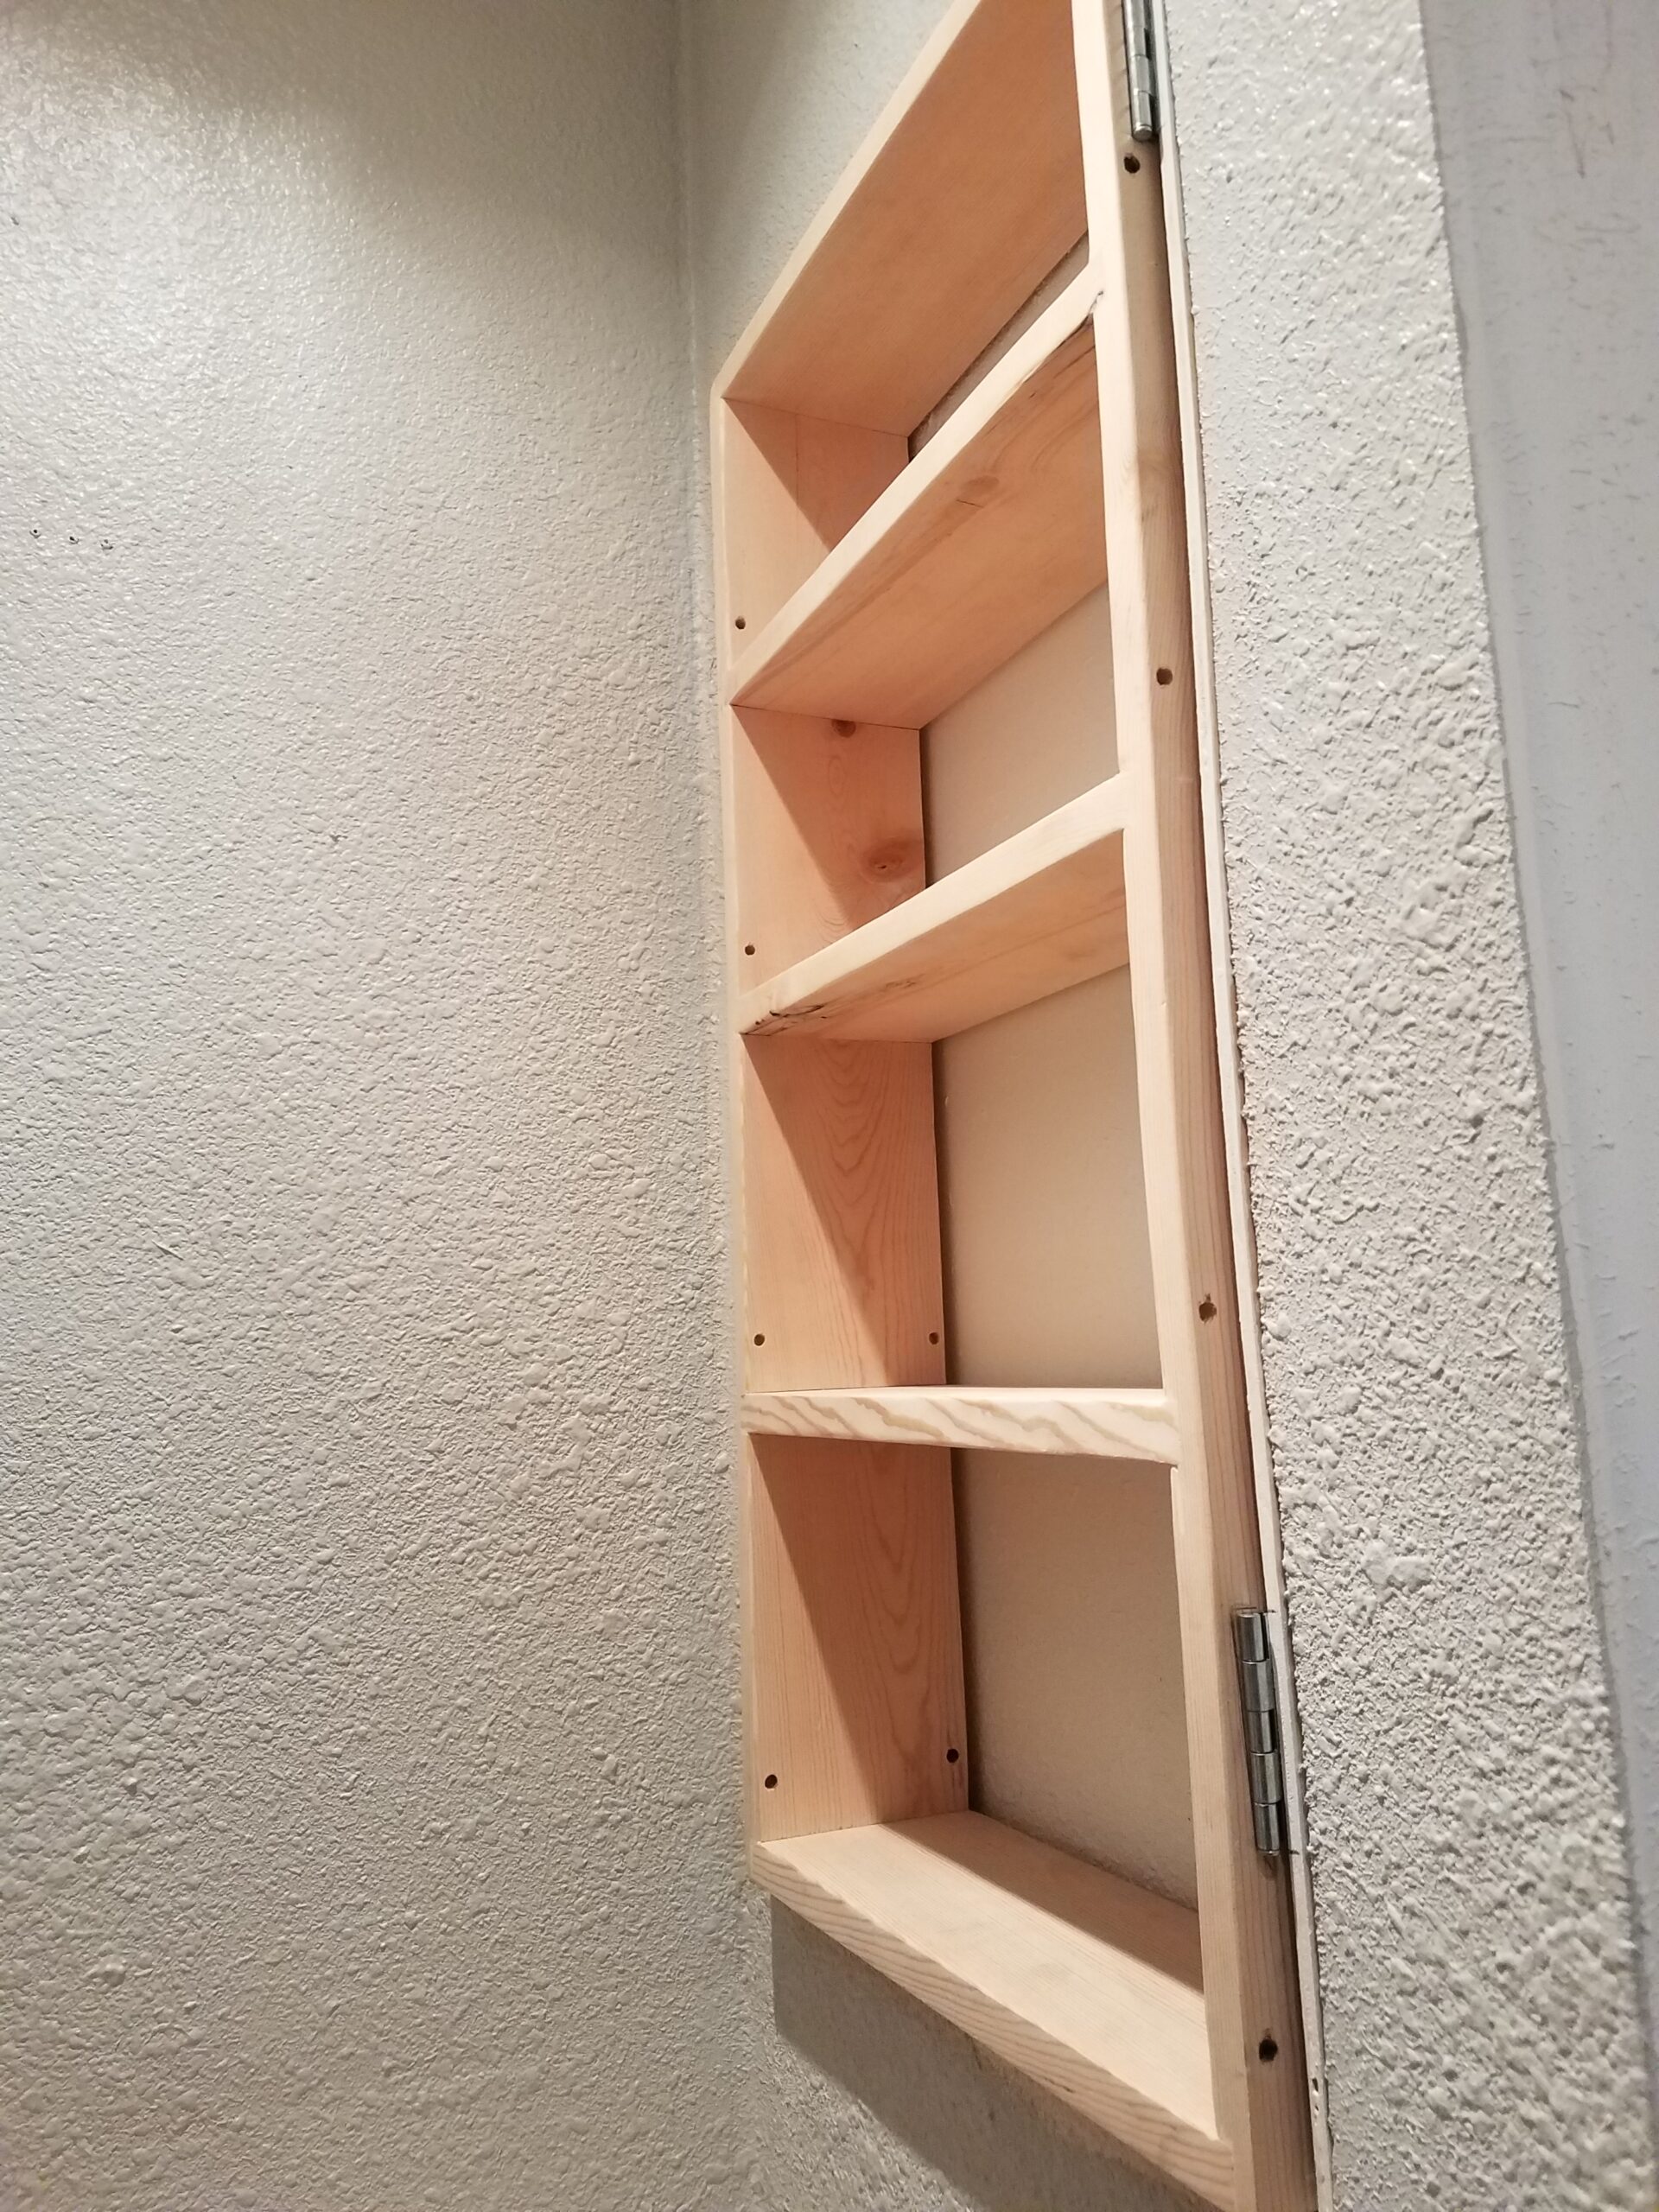
The other obstacle we faced, is that we did not put in enough 2×4 support pieces to aid in supporting the inner shelving. As you can see in this photo, there are no center horizontal supports in the walls. We ended up going back in and putting center support in the right-hand side wall. Our third planning oops was that we made the opening too tall, and after we put up drywall, we went back and added a 2×4 dropped down lower for the doorway.
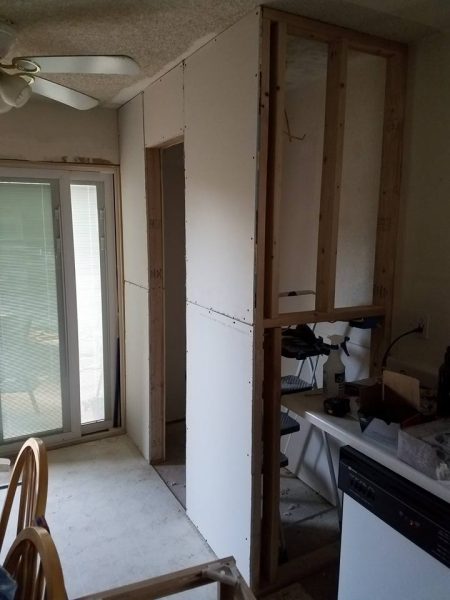
Having completed the framing, electrical and lights, we began hanging the sheetrock. We put up one piece together, and then HandyHubs had to leave to go work on a critical issue at our day jobs (yes, we work together too). I have to admit, at this particular moment, I start to feel extremely overwhelmed and pretty upset with myself for putting us in this predicament. Our house is a disaster – food and appliances on folding tables in both the upstairs and downstairs living rooms, dirt and dust. We are trying to paint the laundry room downstairs and get it ready for the appliances that will be delivered the next day. We are trying to get the pantry to a state where we can put all the mess back in there AND we are trying to prepare for a camping trip with all the kids – our three nieces, nephew, my son and his best friend (3rd son we call him). So, you can imagine my frustration when HandyHubs says, “sorry, gotta go – we will try to work on this again tomorrow.. or maybe tonight.”
This girl – this girl here decides she can hang the drywall. It’s not THAT hard…… uh huh. HandyHubs had a piece of drywall ready on sawhorses; I just needed to measure the area and cut it. I decided to grab the younger son and use some of his youthful strength for helping me carry it in and hold it up for me to screw it in. He was a HUGE help to me for the first two pieces, and the second sheet setup then abandoned me as well. Let’s just say, I got it done, no one got hurt and HandyHubs came home amazed, but also stated “don’t worry babes, when we do the taping those gaps won’t even be visible”. SHRUG! It wasn’t perfect by any means, but this girl can hang some drywall 🙂
I cannot tell you how excited I was to paint the interior walls, stain the countertops and see the custom shelving go up! I decided against a hanging light fixture, even though I LOVED the idea of it. In fact, each trip to Menards and Lowe’s started with me gazing longingly at light fixtures. HandyHubs pointed out the overhead space restriction and the ease of being able to access items up high without a light in the way – and he was right.
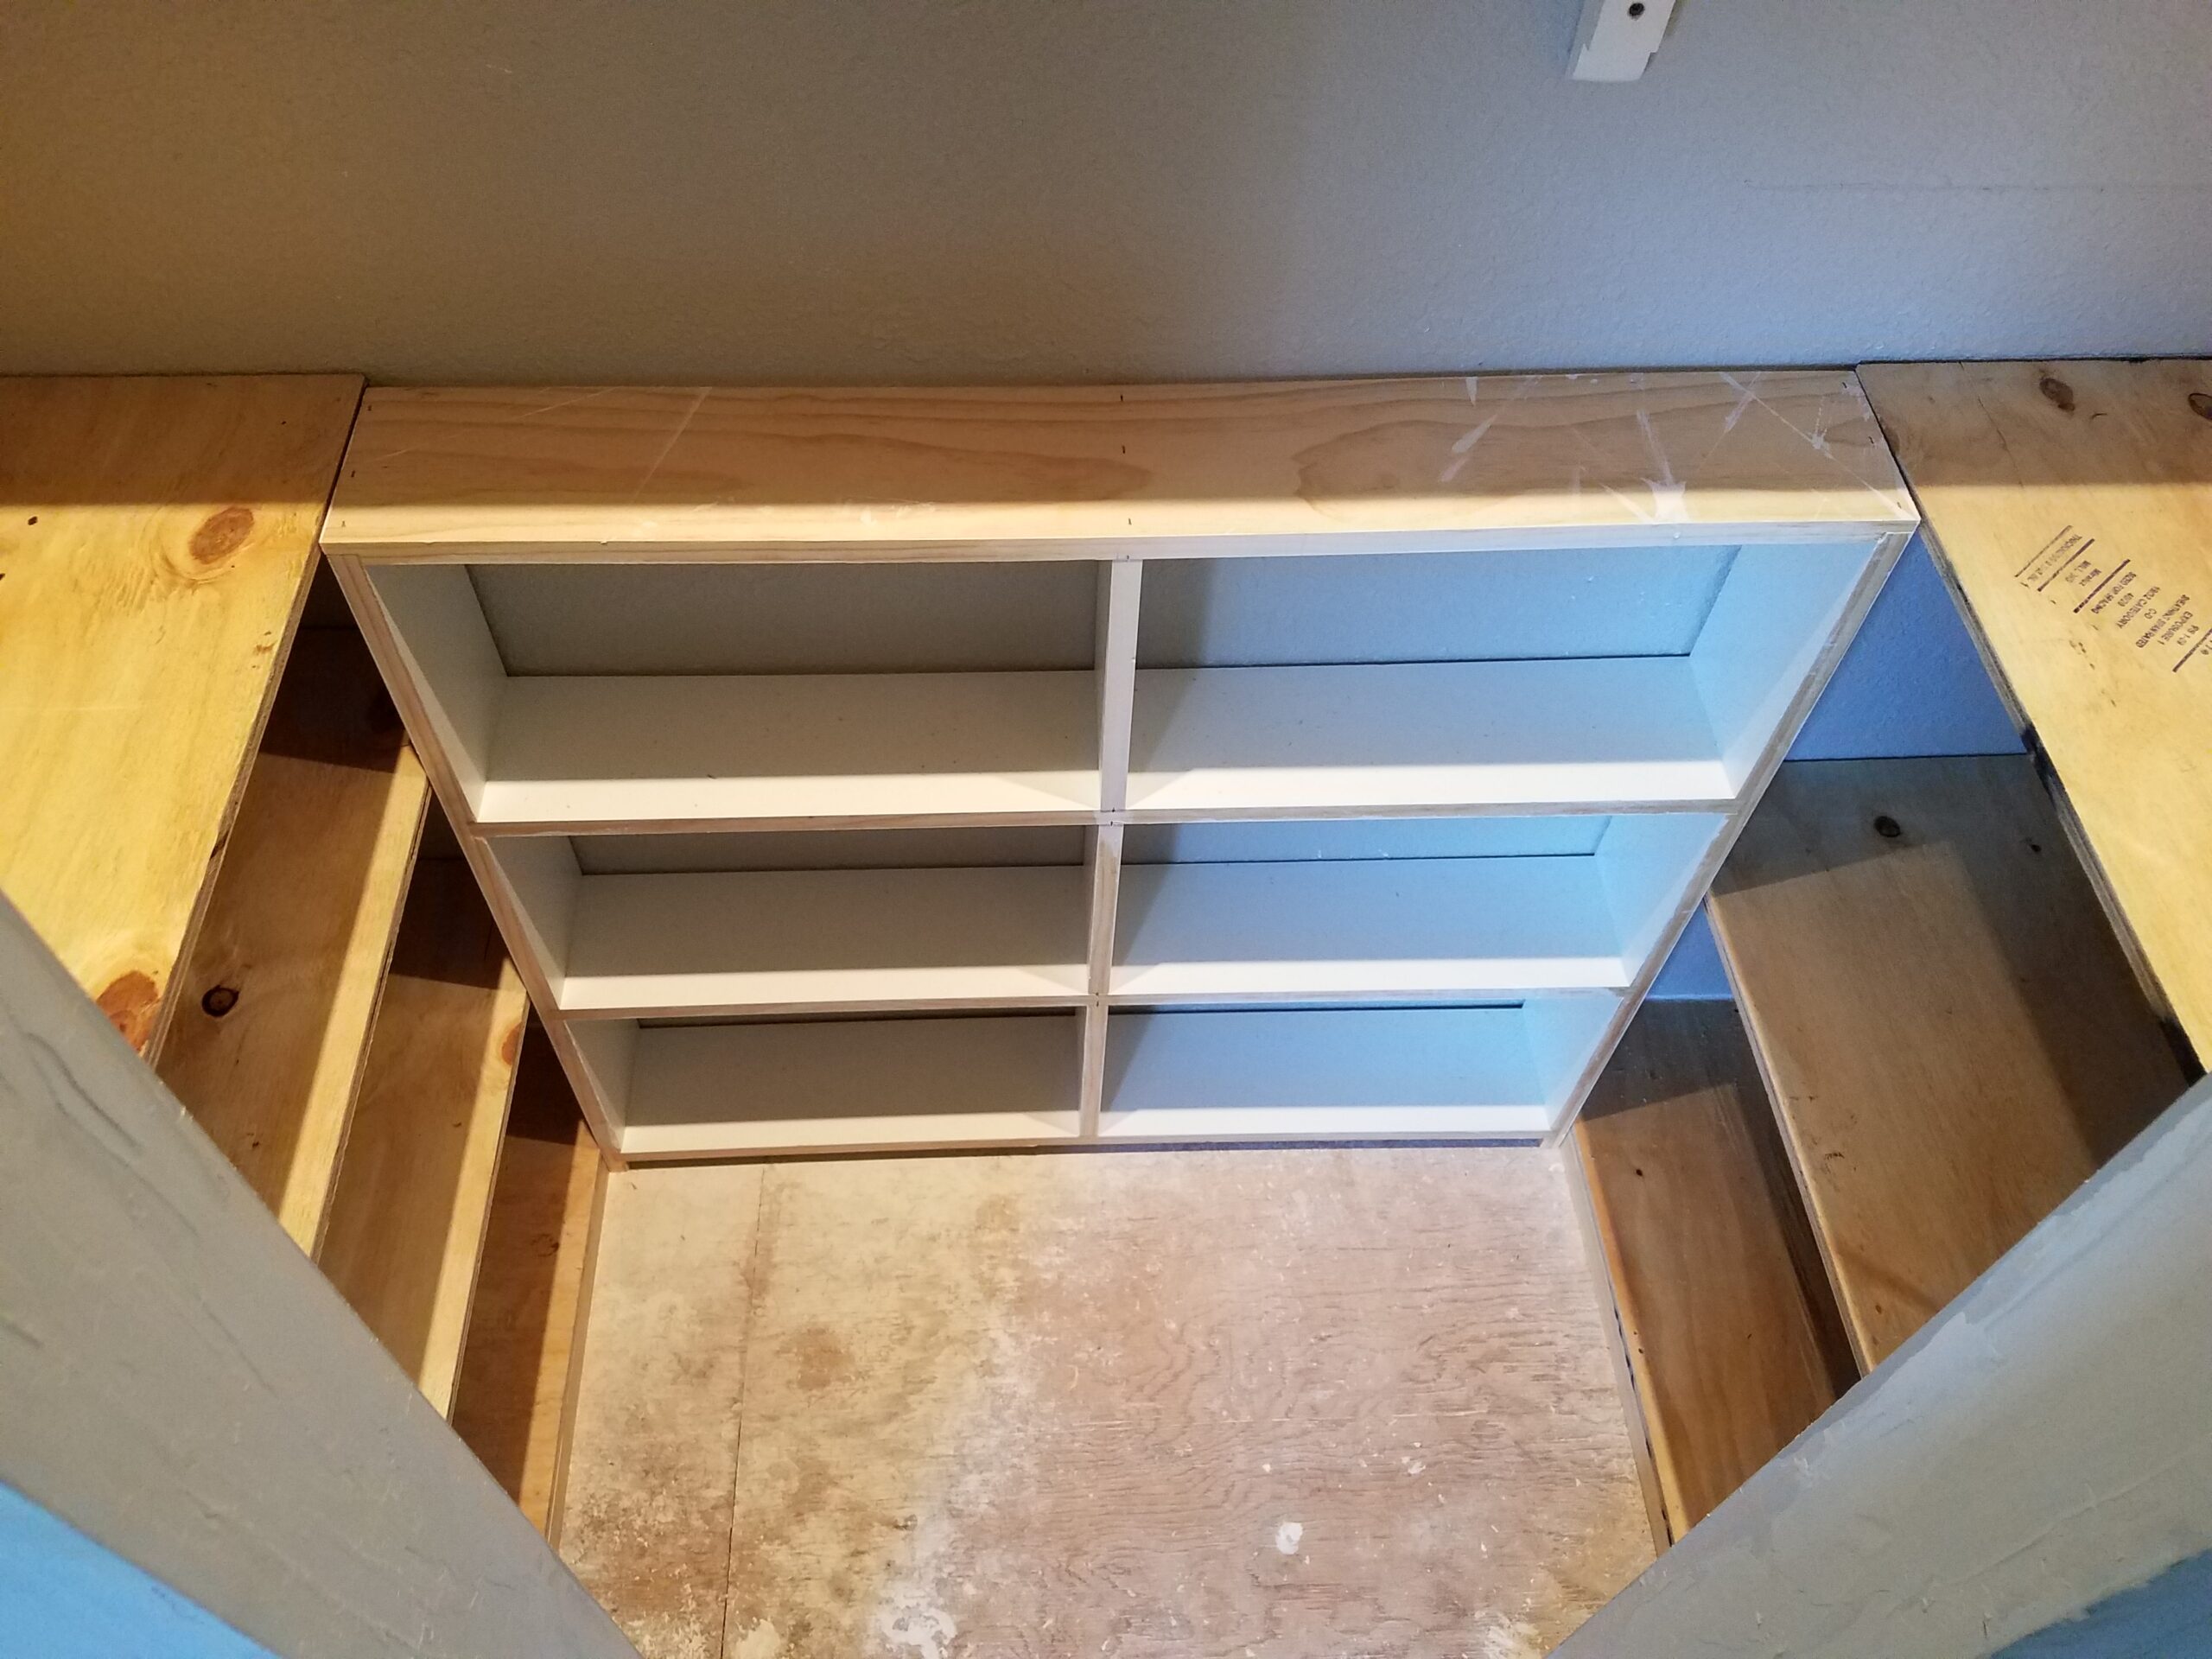
I read many tips on how to space the shelving and how deep to have the shelves be as well. We built the countertops on each side pretty deep, while the one across the back would only be about 8 to 10 inches deep to allow for step in space. The shelves would be staggered in depth. The bottom shelf is 10″ deep, the second is 8″ and the third is 6″. To determine the space between the shelves, I used some large cereal boxes and storage containers that I had on hand. Since the back countertop was not going to be very deep I decided to have HH build a slim shelving unit where canned goods could easily be stored.
This was enough space for cans to stack two high and two deep. I do not generally purchase caseloads of canned goods, so this option worked well for us.
We felt so much relief once the painting, lights, and shelving were installed. I mentioned earlier in the post in my wish list that I wanted a spice storage area within the pantry as well. HH and I went back and forth on how to best achieve this. At the time, we had been using the upper cabinet to the right of our stove. The bottom shelf had one of those plastic ladder types of units where you could display the spices and be able to read them easily. Unfortunately, we loved to buy spices and it was becoming increasingly unmanageable.
I drew up an idea for a built-in, swing-out pantry unit inside the interior wall of the pantry. If it was built into the wall, it wouldn’t take up any of the usable pantry space and it would be easy to find things. HH to the rescue!
He cut the drywall from between the stubs on the interior wall to the right, then built a shelf to fit. I requested that he put it on hinges so that it could swing out from the wall. to keep the spices in the shelf HH also added some metal dowels. I LOVE my new spice cabinet and it holds spices two deep on each shelf so i can fit nearly 50 bottles of spices!!
That’s it for the pantry at this time, I will provide a follow up post on the exterior and completed pantry soon!